


Minecraft on Apple Silicon
Can I run Minecraft on my new M1/Apple Silicon Mac?
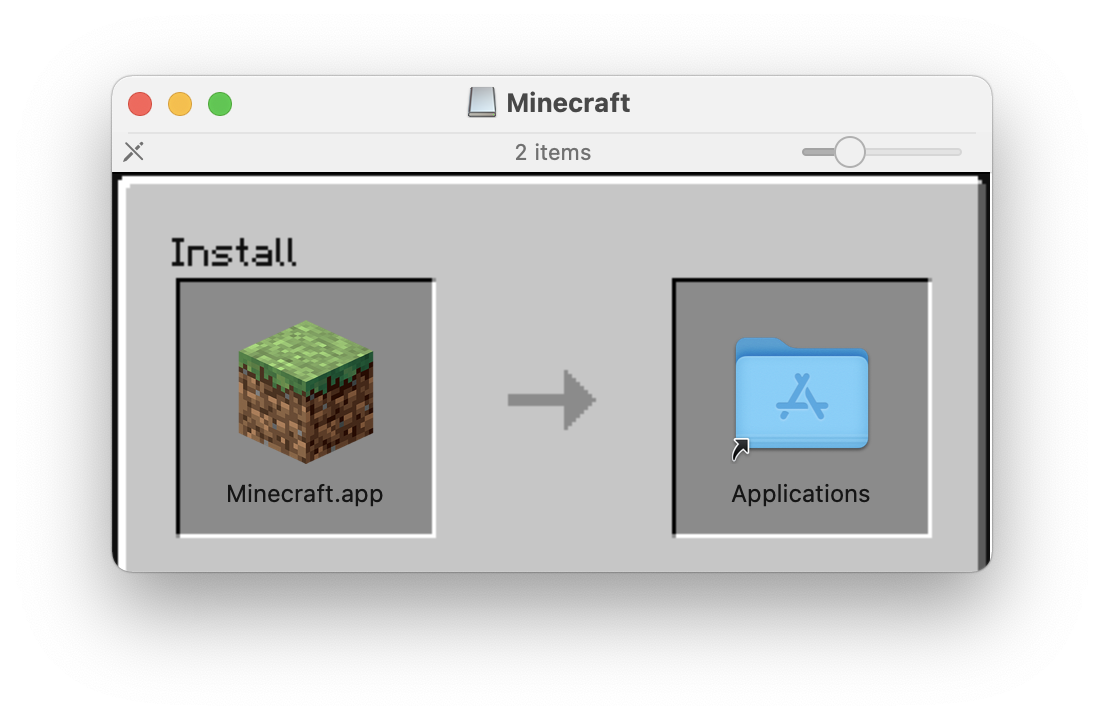
Sure! Let’s start with the simplest scenario and go get the official Minecraft: Java Edition client for macOS. Open the DMG and drag the Minecraft app to the Applications shortcut:
(Note that this requires you to install Rosetta 2, which is foreshadowing for the rest of this post.)
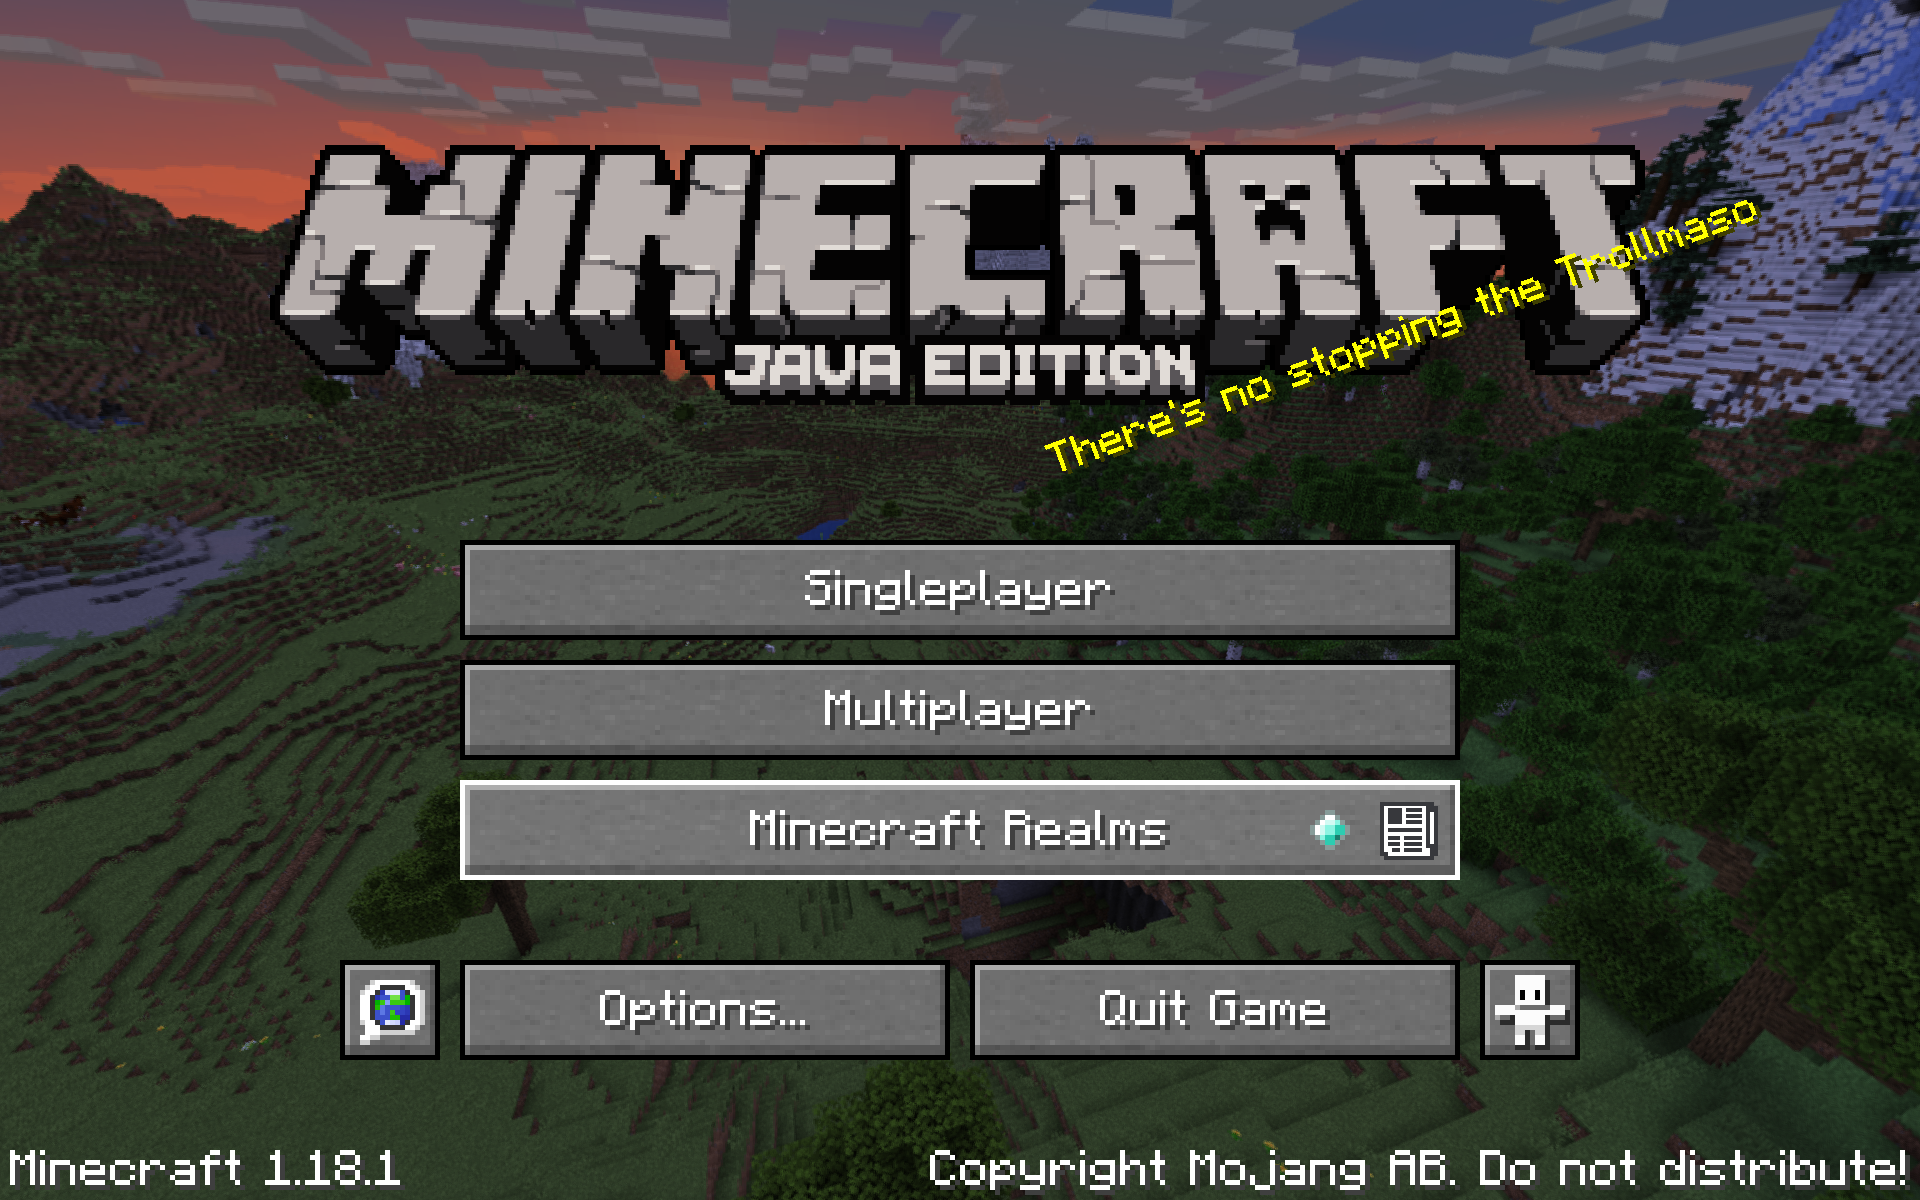
Log in with your Microsoft or Mojang account. Unless you have already played Minecraft through the official launcher, the launcher should default to giving you a new 1.18.1 instance. Click “Play” and let the launcher download all the assets it needs. Once it launches you’ll be greeted by the usual Minecraft title screen:
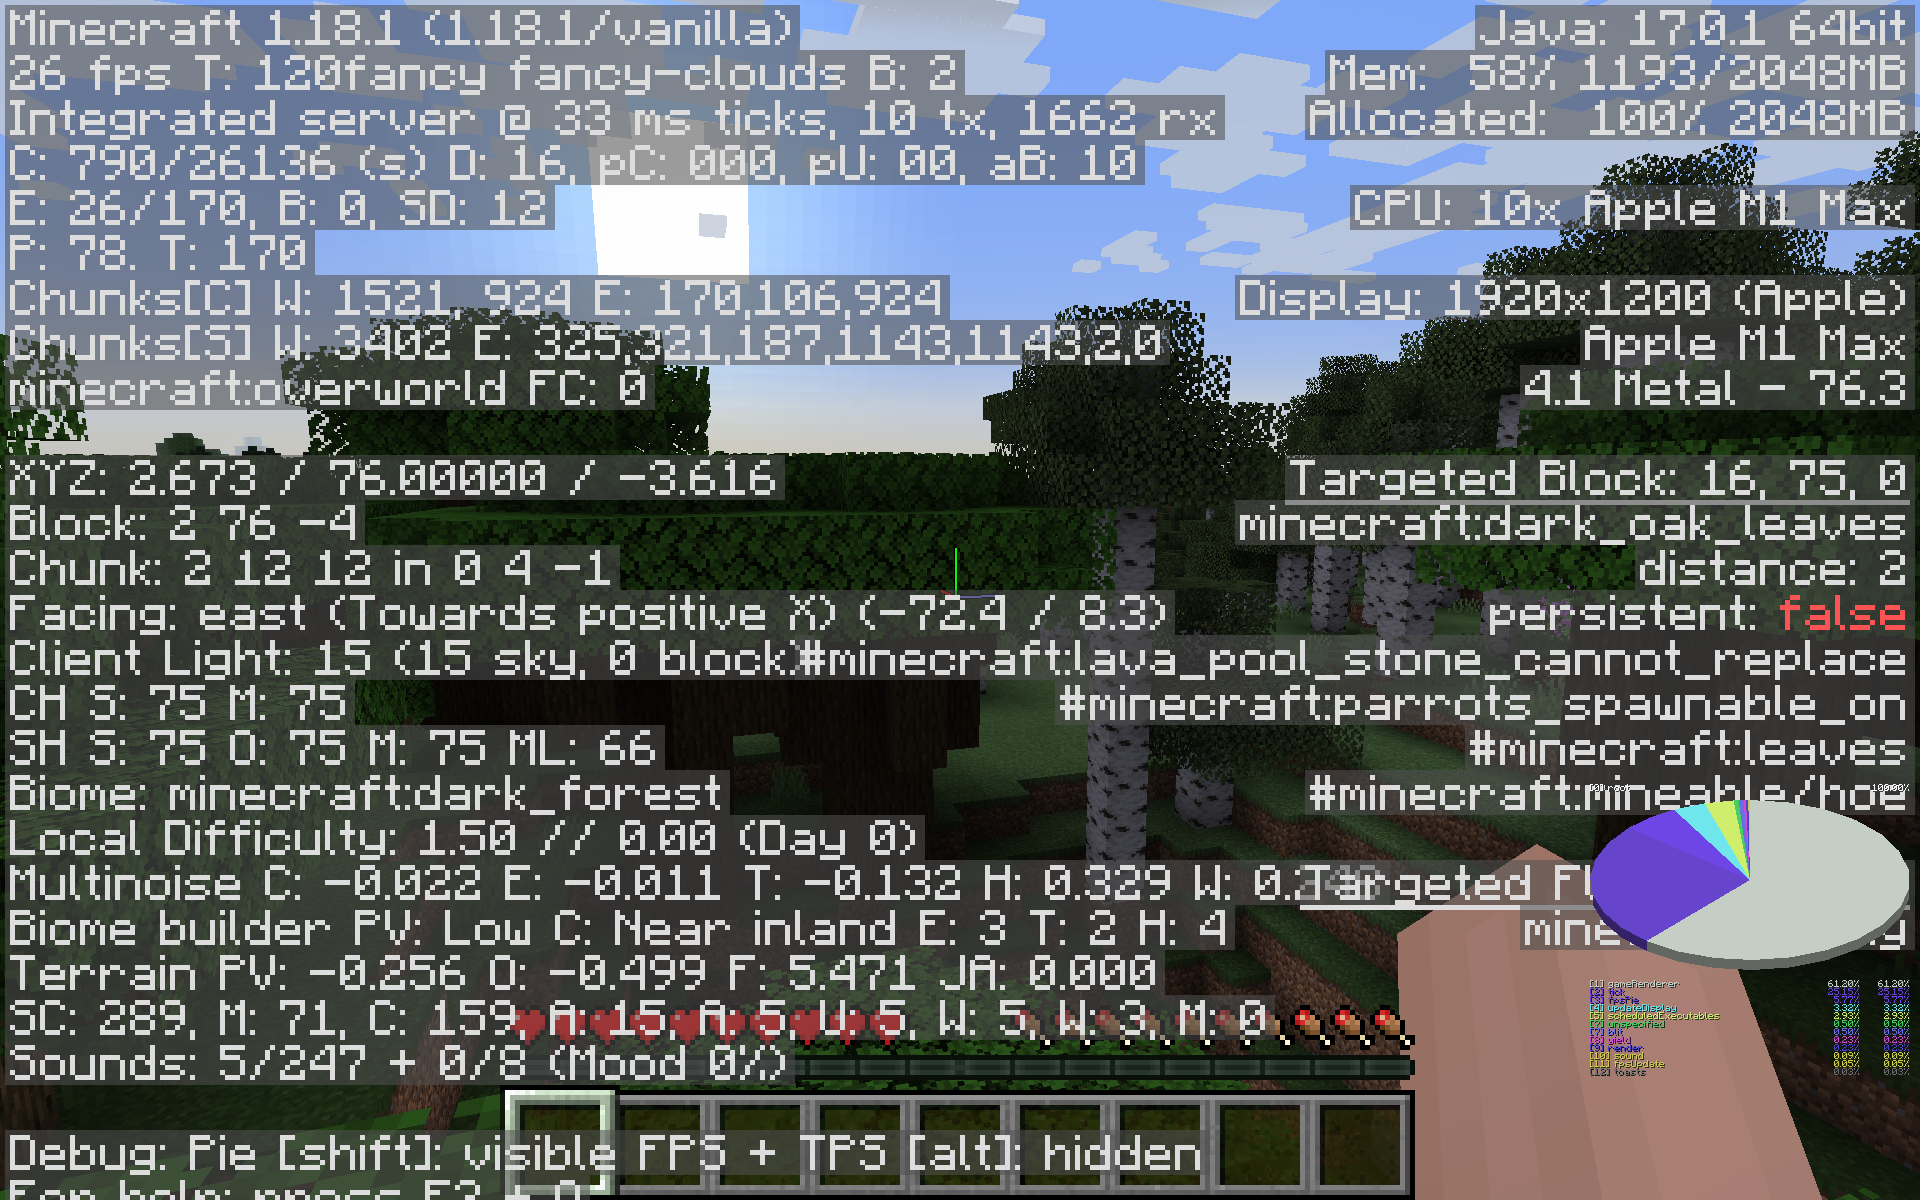
Create a new world just to make sure everything works, and hit F3 to take a look at your frame rate (upper left-hand corner). It will probably be pretty low right when you start the world simply because Minecraft is still generating chunks and whatnot, but after a few seconds it should stabilize. On my M1 Max, I saw 21 frames per second as soon as I entered the world, but it quickly ramped up to about 60-70 fps, with dips into the 40s and spikes into the low 100s.
Just after starting the new world:
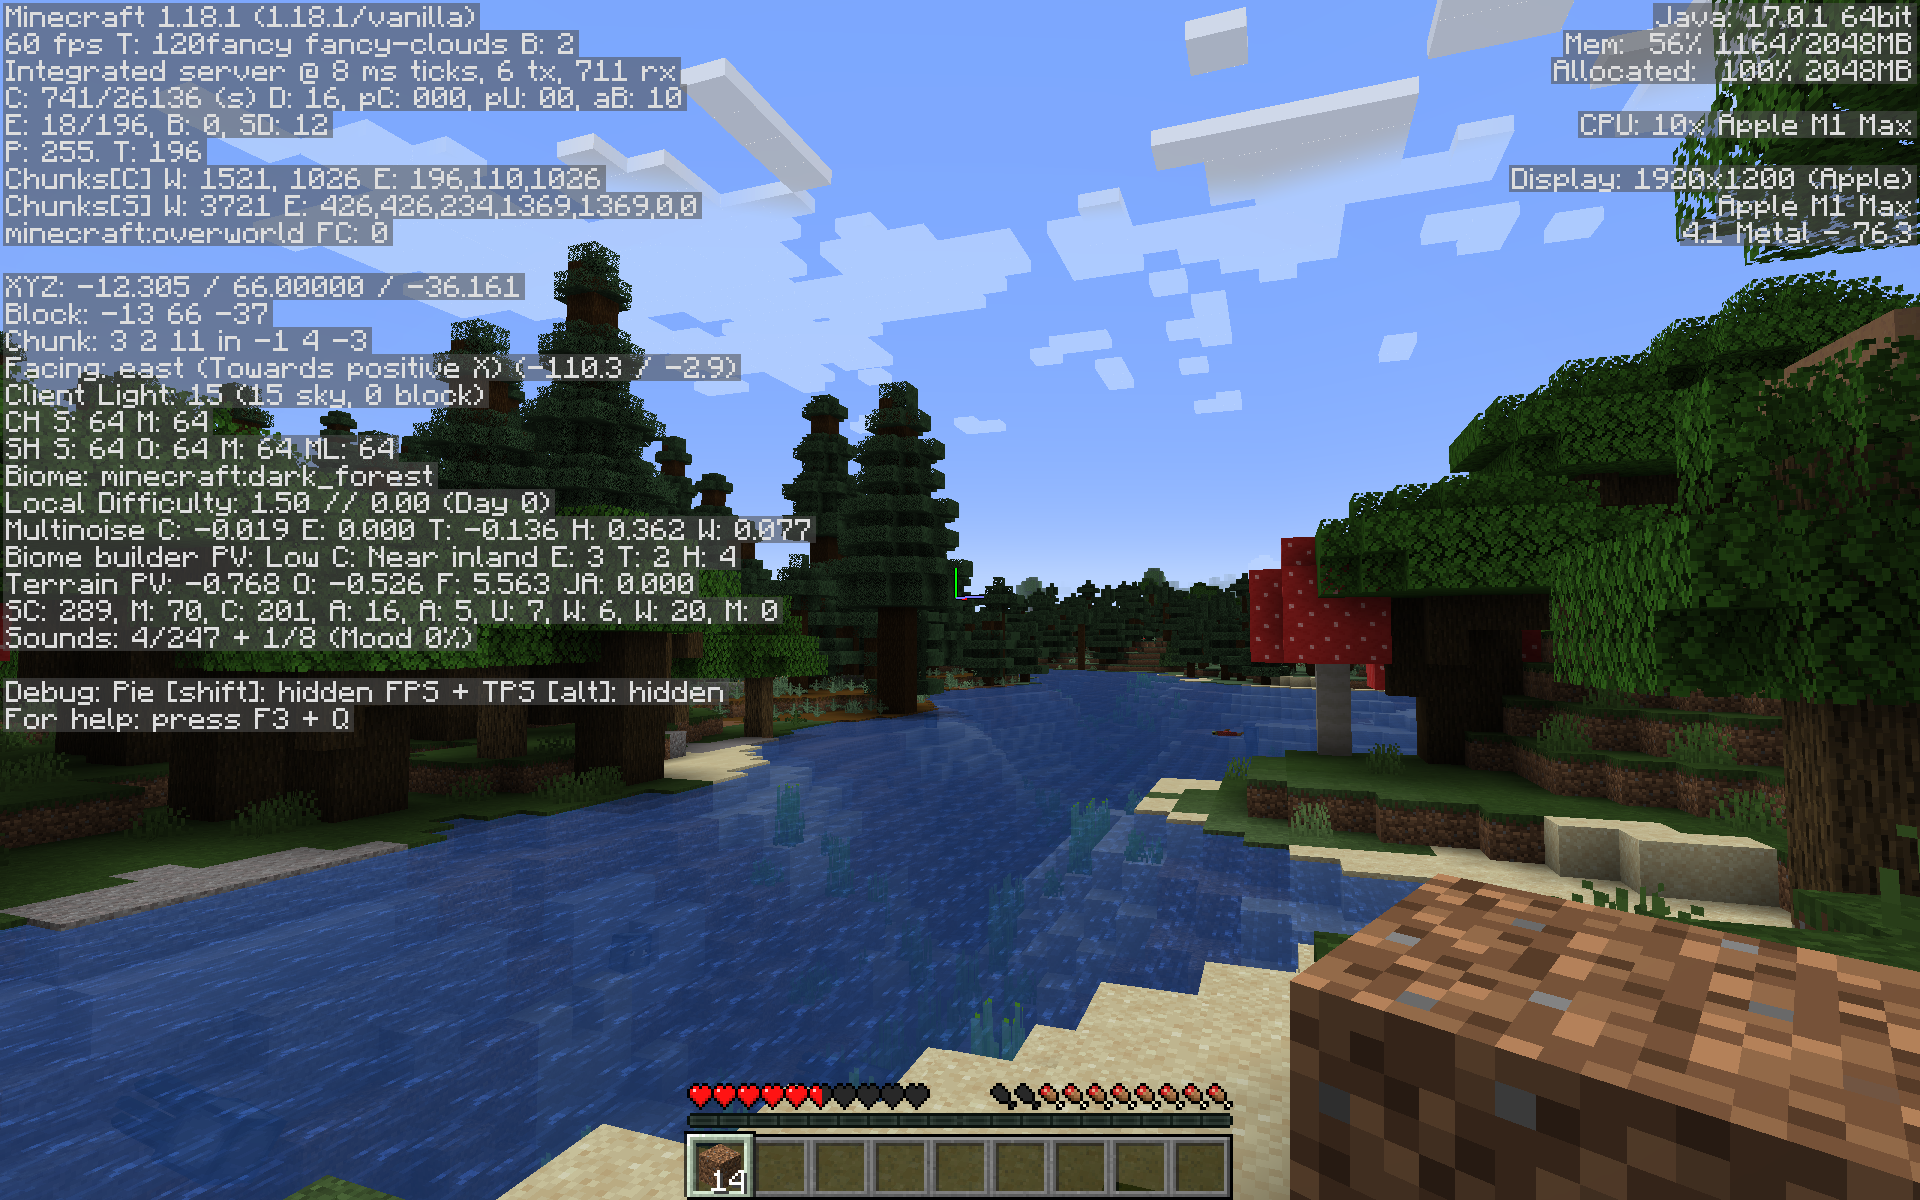
…and after a few minutes:
Not bad. Let’s quit the game and see if we can do better.
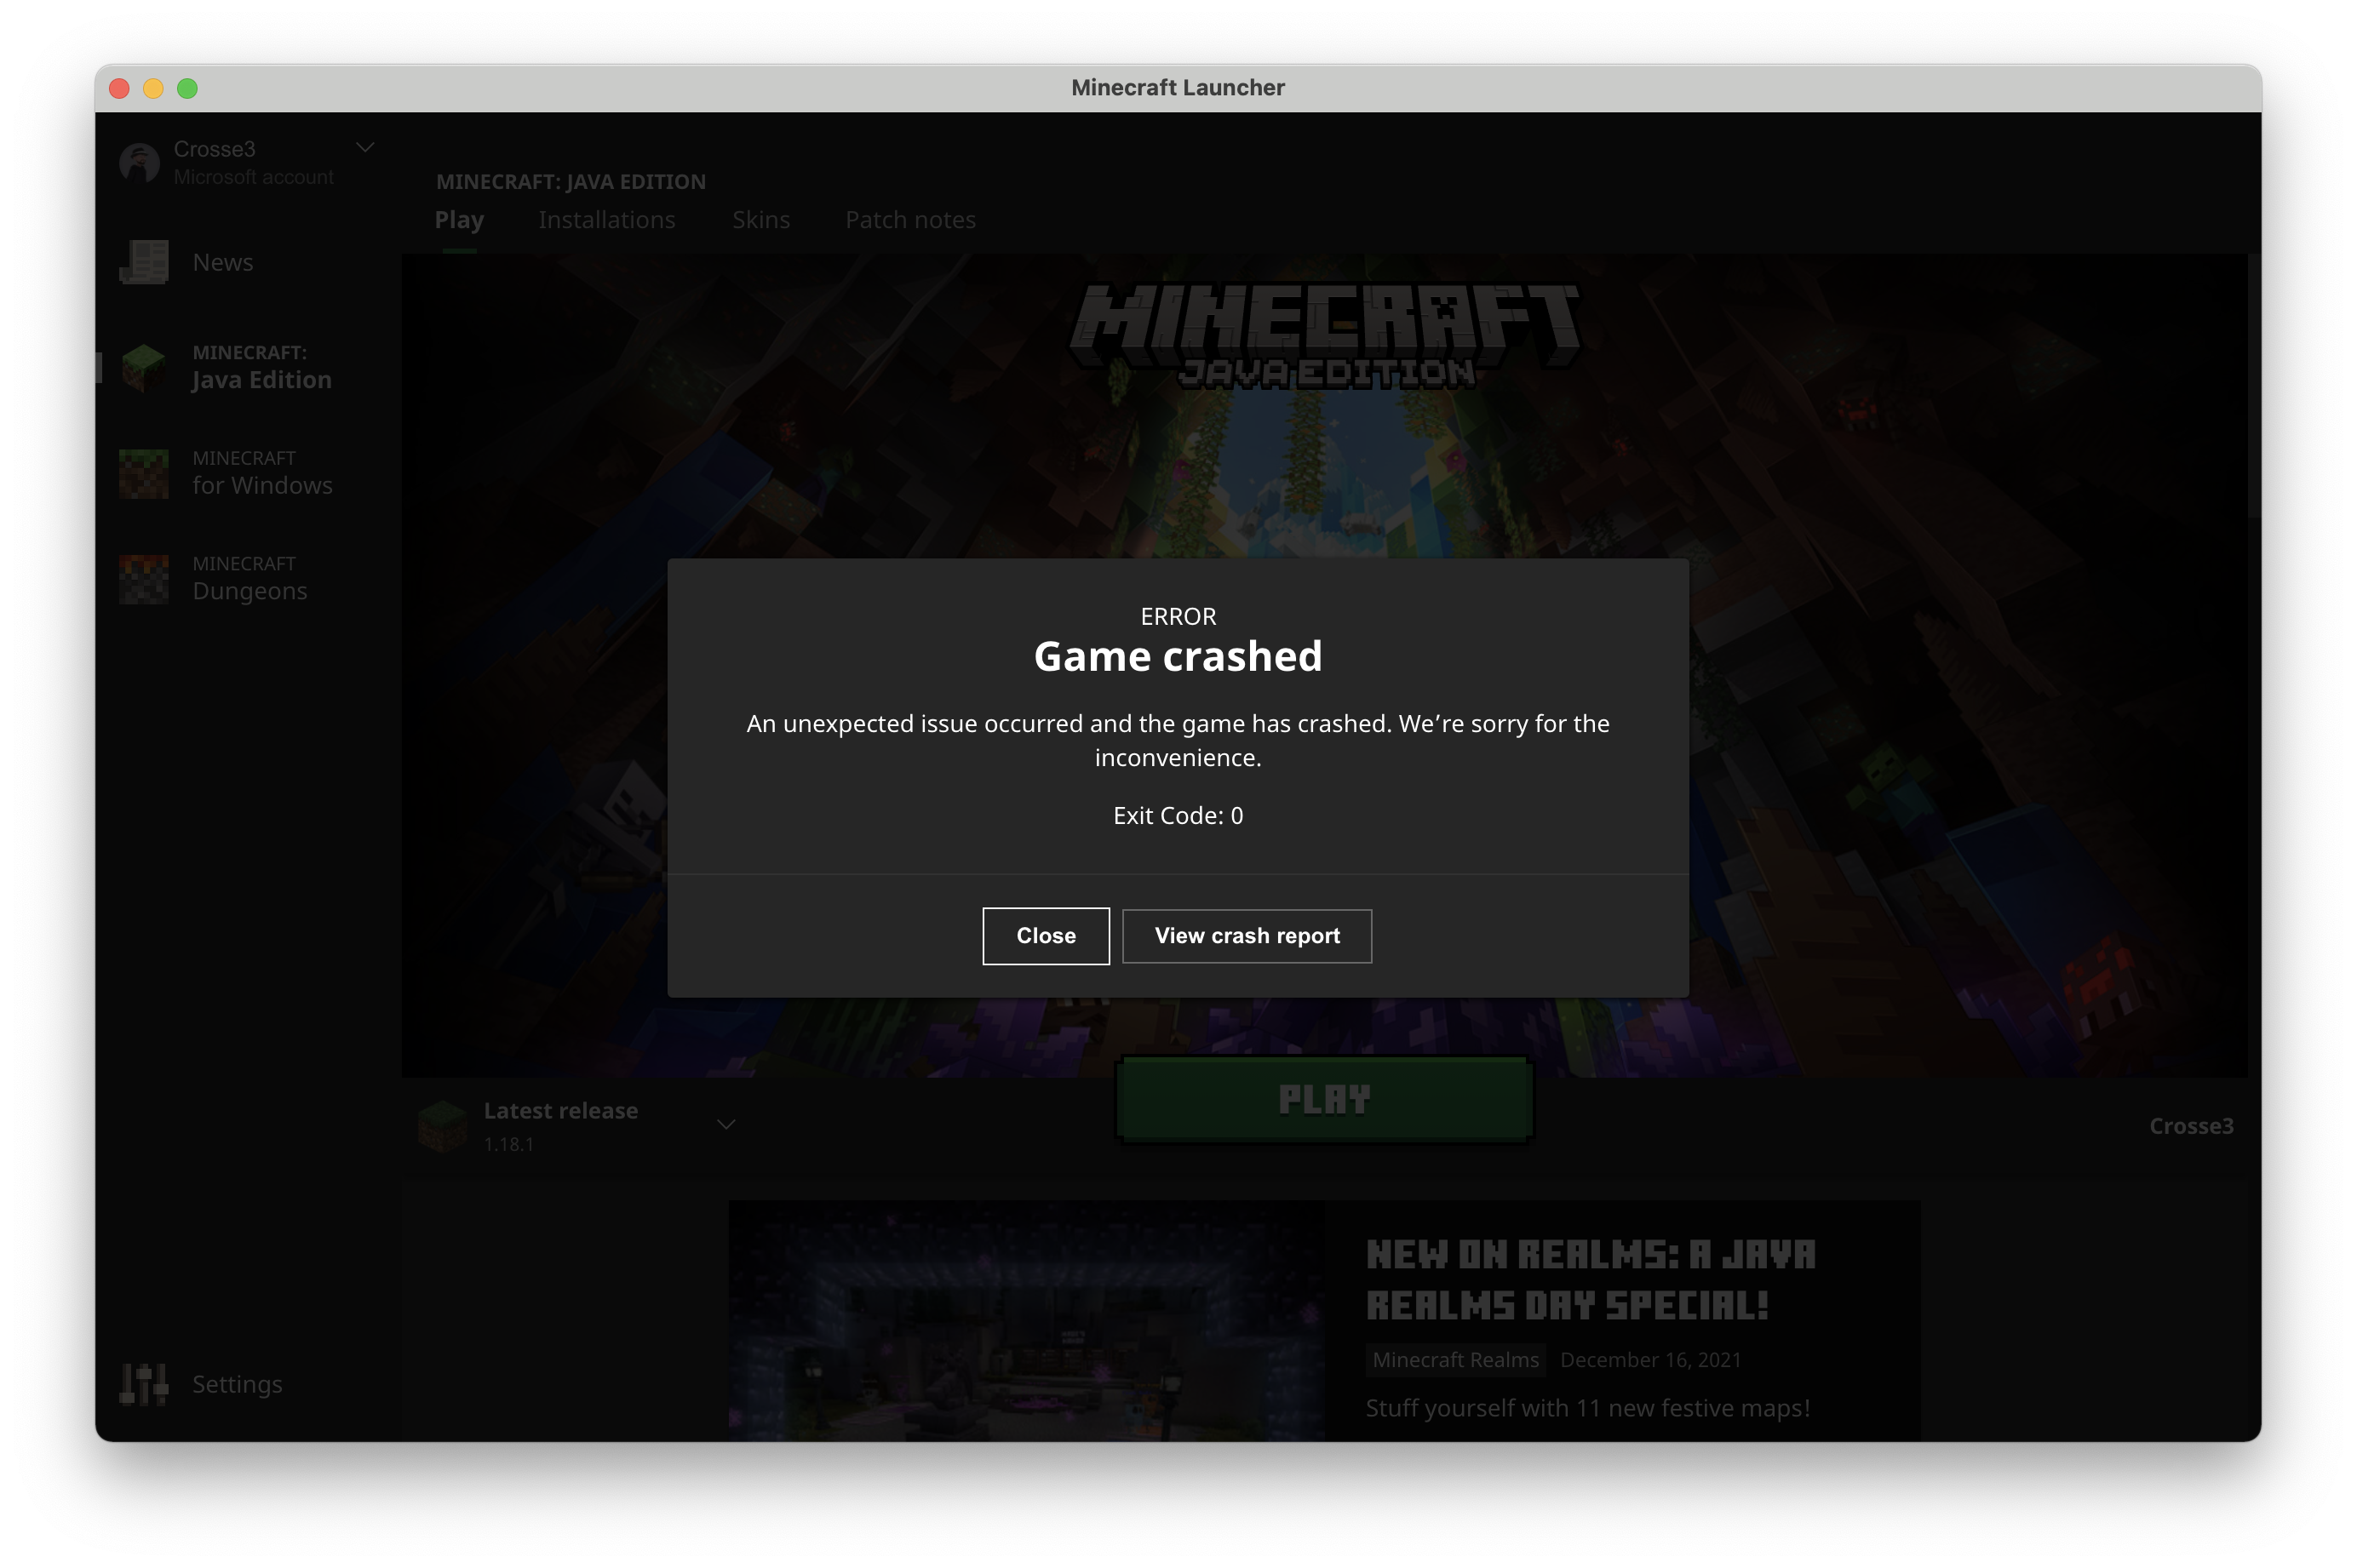
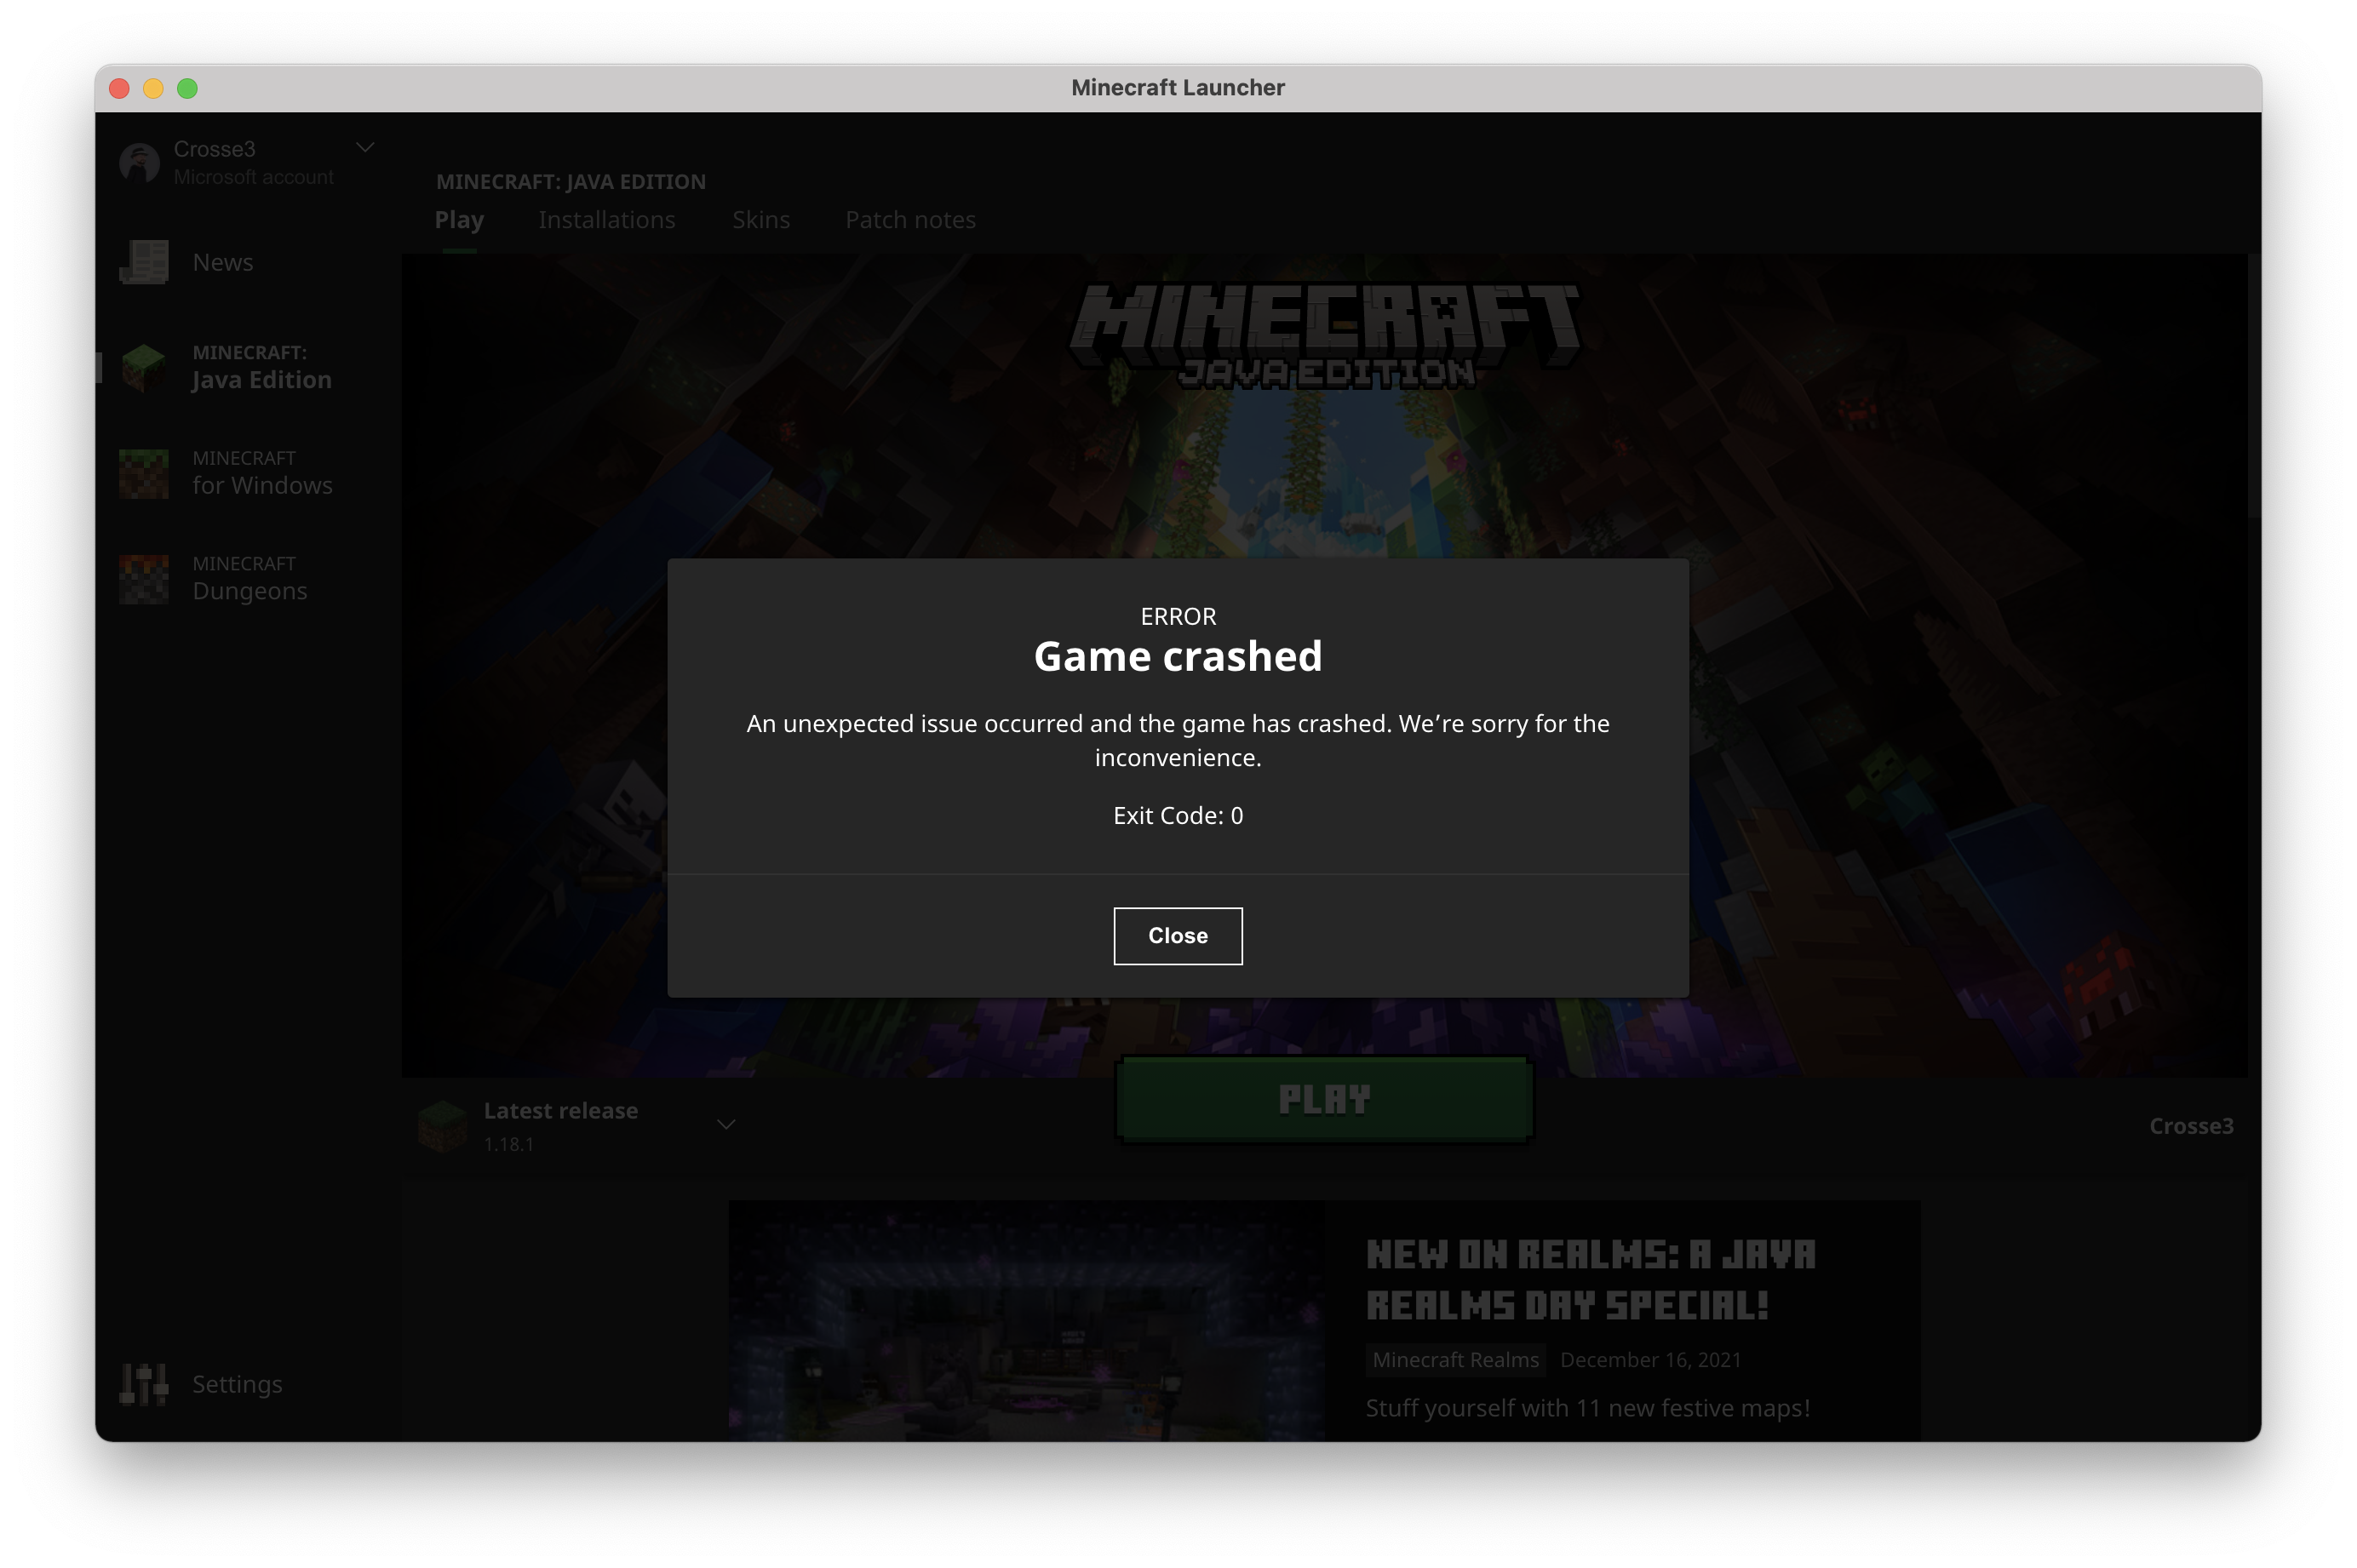
…Uh, wait a minute. The game crashed! I don’t remember that happening on my Intel-based MacBook Pro. We should probably investigate that.
(Note: maybe don’t immediately start doing all the things I do in this article, as you read it. I wrote it in a stream-of-consciousness style, walking through various reasonable steps a reasonably technical person might do, so you can better understand the why of the solution I present here. When doing my own research to get Minecraft working as well as I could on my M1 Max, I found a number of GitHub gists and blog posts that essentially boiled down to, “just go download these random binaries someone built and run this wrapper script and everything will be alright!” There’s nothing inherently wrong with that, and if you’d rather just get things working and don’t care about seeing me blather on, I encourage you to seek those resources out. But I needed to understand why those steps are necessary and wanted to use binaries I built instead of trusting someone else’s year-old builds, and wanted to pass on that knowledge to others who might find it useful.)
Intel, Arm, and Universal Binaries, Oh My!
If you’ve had your Apple Silicon-based Mac for a bit, you may have come across software that is not optimized for the M1 processor. Instead, the software is built for Intel-based Macs (which have been around since 2006), and this software will not run on an M1-based Mac without Rosetta 2 installed. Rosetta 2 is a layer that interprets the Intel machine instructions and translates them to the native Arm instruction set that the M1 processor can understand. As you can imagine, this translation does not come for free, and running Intel-only apps on an M1 Mac can be much slower than if it was natively built for the M1.
You may have never (or very rarely) had to actively decide whether to download and install an Intel (also called “amd64” or “x86-64”) versus an Apple Silicon (“M1”, “arm64”, or “aarch64”) app. This is because Apple has what they call “Universal Binaries”, which just means that one executable file can contain a version of the code compiled for Intel as well as another version compiled for the M1. This is what most developers target nowadays, so that their app will run natively regardless of whether it runs on an Intel or Apple Silicon processor.
With the technicalities dispensed with, we can easily see whether an app was compiled for the M1 or
whether it’s running under Rosetta 2. Open Activity Monitor (check in the Utilities folder under
Applications, or use Spotlight to find it) and check the “Kind” column. If it says “Apple”, then
that software has been compiled for the M1. If it says “Intel”, though, then you can be sure that
macOS is using Rosetta 2 to run the app, and performance may not be on-par with what you might
expect from your fancy (and expensive) new machine. Let’s take a look at the java process when
Minecraft starts up:
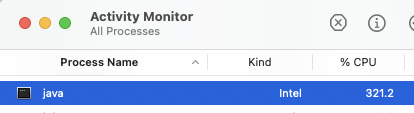
Hm, Intel.
“But wait,” you say, “I don’t remember installing Java!” True: Minecraft bundles its own JRE (“Java Runtime Environment”) so that you don’t have to bring one to the party. It also lets them update it so you don’t have to remember to do so.
So what we’ve discovered here is that the Java runtime that comes with Minecraft is not optimized for the M1 processor, so Rosetta 2 has to translate the entire Minecraft experience from Intel instructions to M1’s “Arm” instructions. That can’t be good for performance. Can we fix that, maybe?
BYO JRE
It turns out, maybe we can! The Minecraft launcher lets you bring your own JRE to the party if you really want to. What if we got a native M1 “arm64” version of Java 17 and told Minecraft to use that?
You’ll need to get yourself a Java runtime built for Arm instead of Intel. The easiest way to do this is to head to Adoptium or Azul, both of which offer OpenJDK builds for a number of different platforms. (I used the Azul JVMs for this post.) I suggest getting the JDK (Java Development Kit) over the JRE because it comes with niceties like the Java compiler.
What was that? Why do you need a Java compiler if we’re not compiling anything? *looks at the rest of this post* Uh, no reason…
Go to the Azul link above and click the “.dmg” link. Once downloaded, open the DMG and follow the
instructions to install Java 17 where macOS likes them to be
(/Library/Java/JavaVirtualMachines/). The next thing you need to do is tell Minecraft to use this
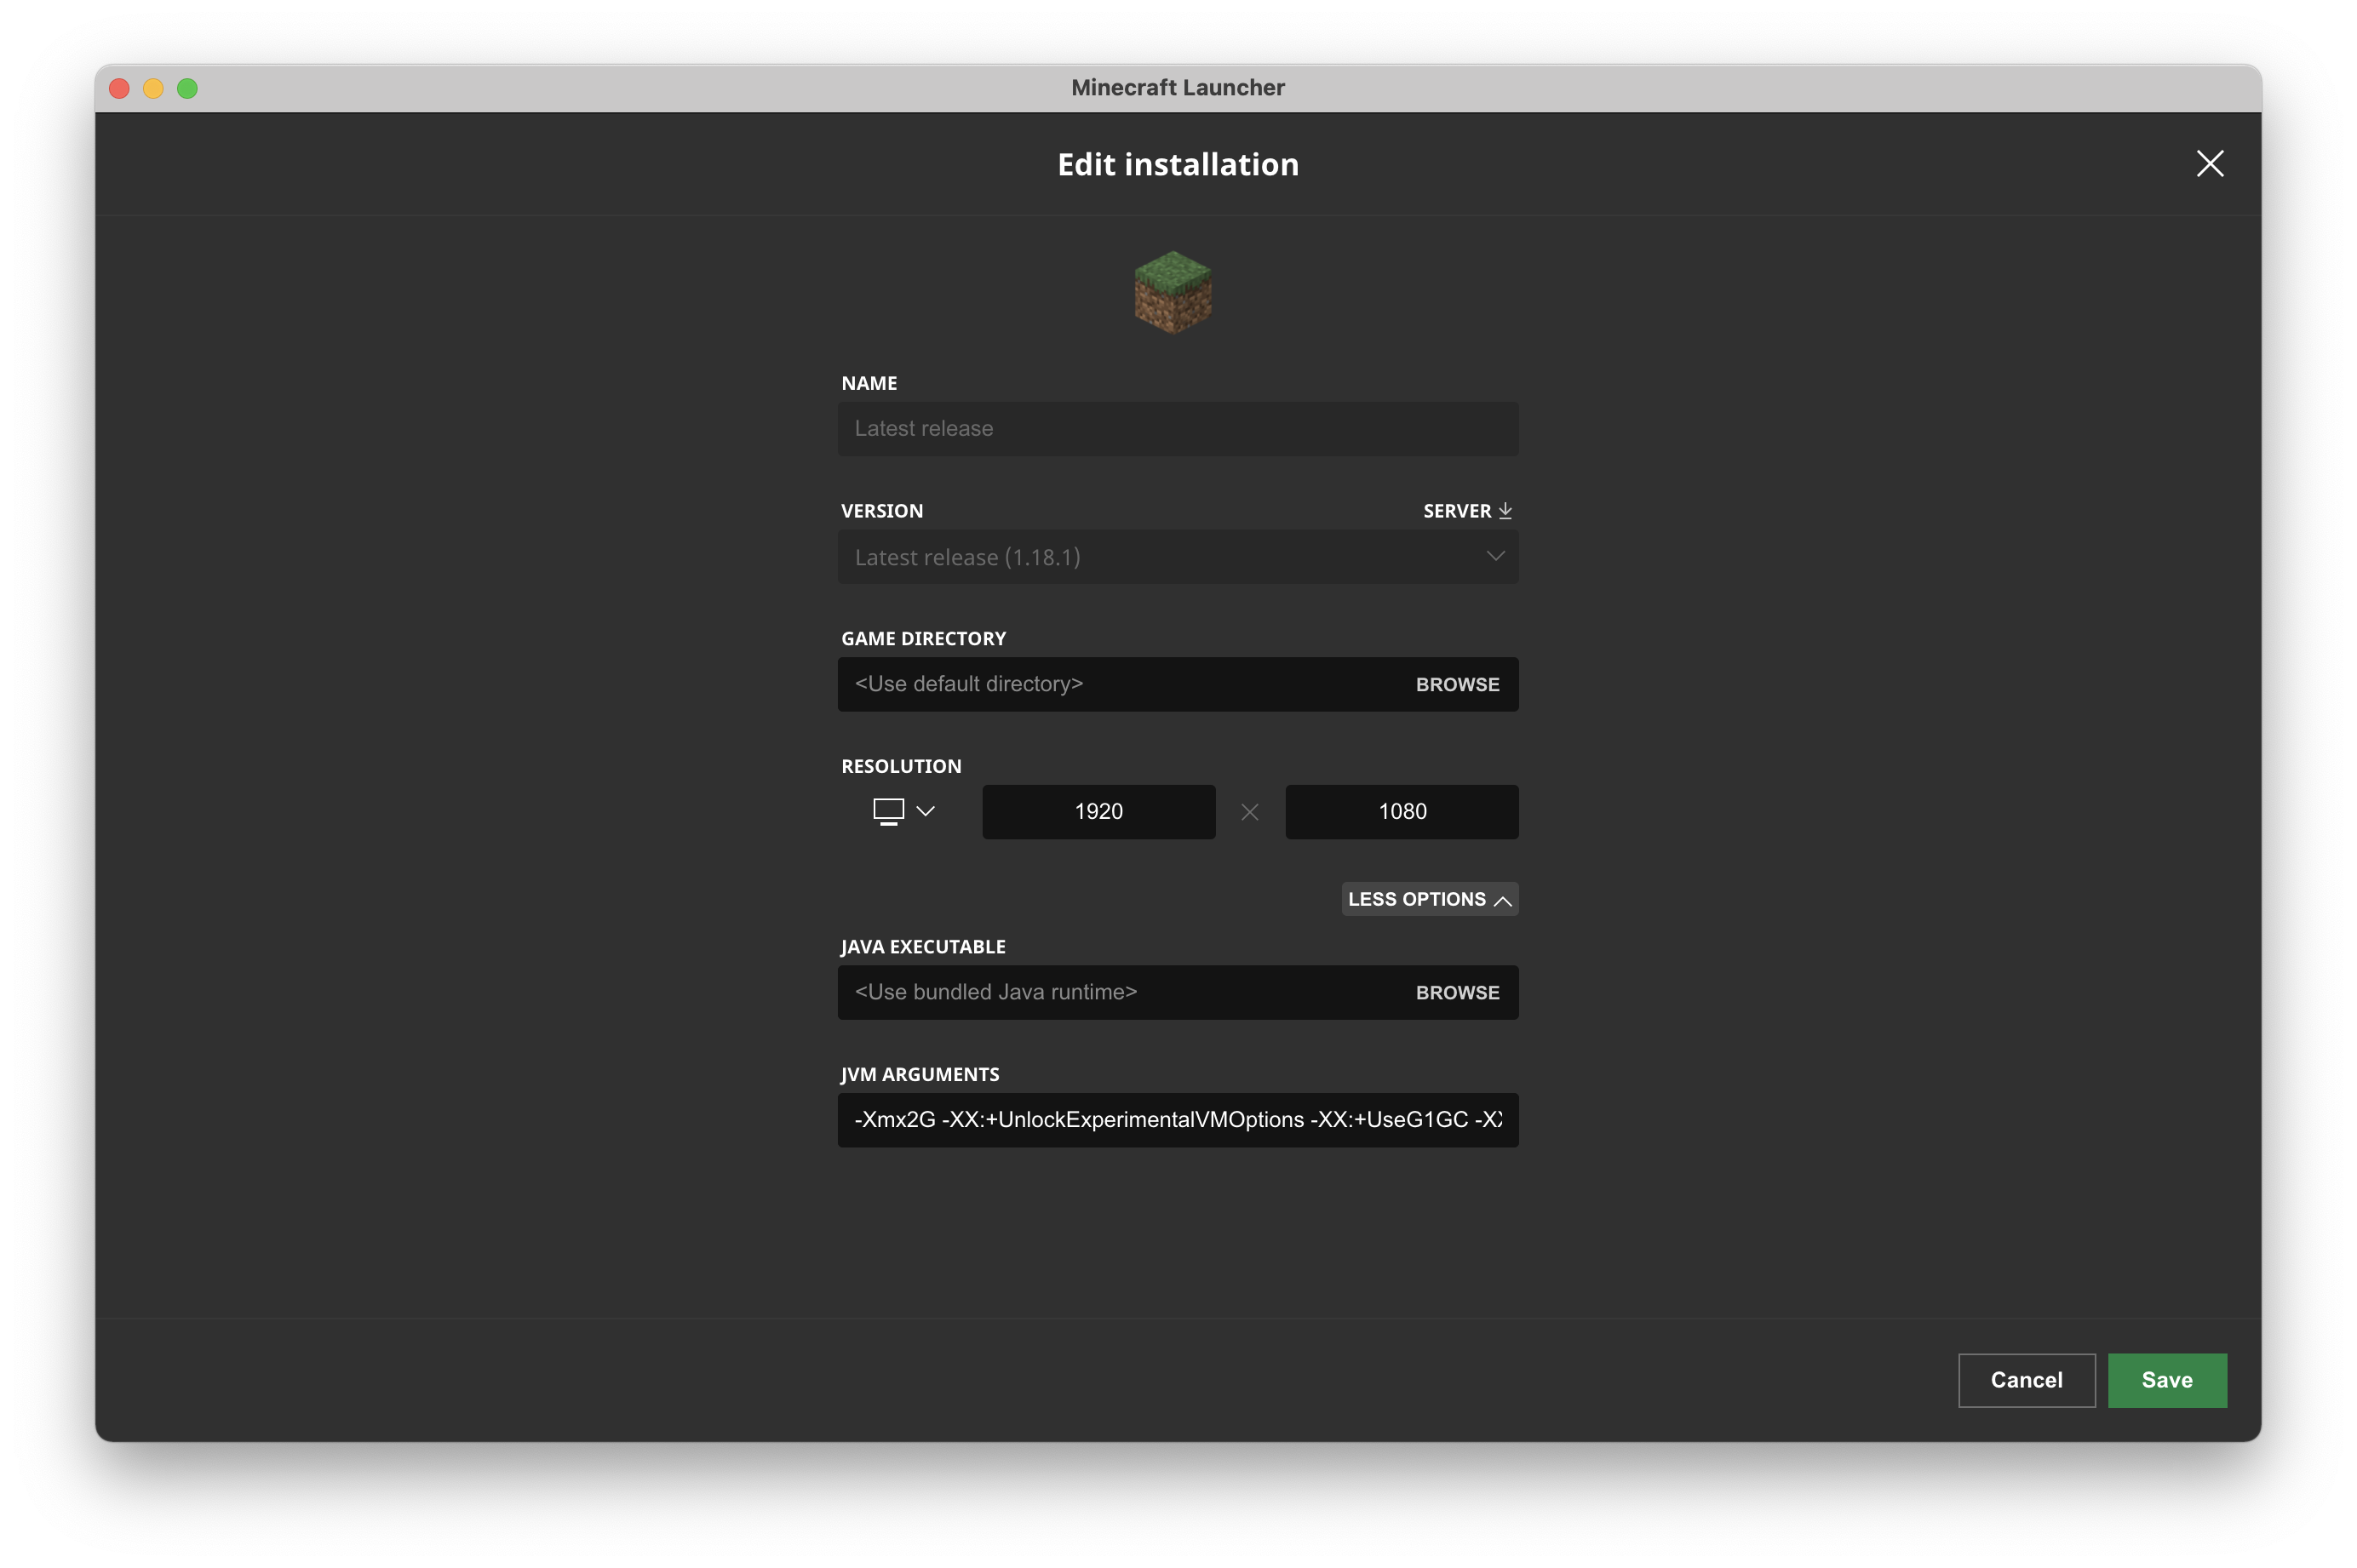
instead of its bundled version. In the Minecraft launcher, click the “Installations” tab at the top
of the window, then click on your 1.18 instance. In the Edit screen that comes up, choose “More
Options”; on the “Java Executable” line, either click Browse to find the java command you want to
use or, if you’re following along with me, just right-click and paste
/Library/Java/JavaVirtualMachines/zulu-17.jdk/Contents/Home/bin/java into the box.
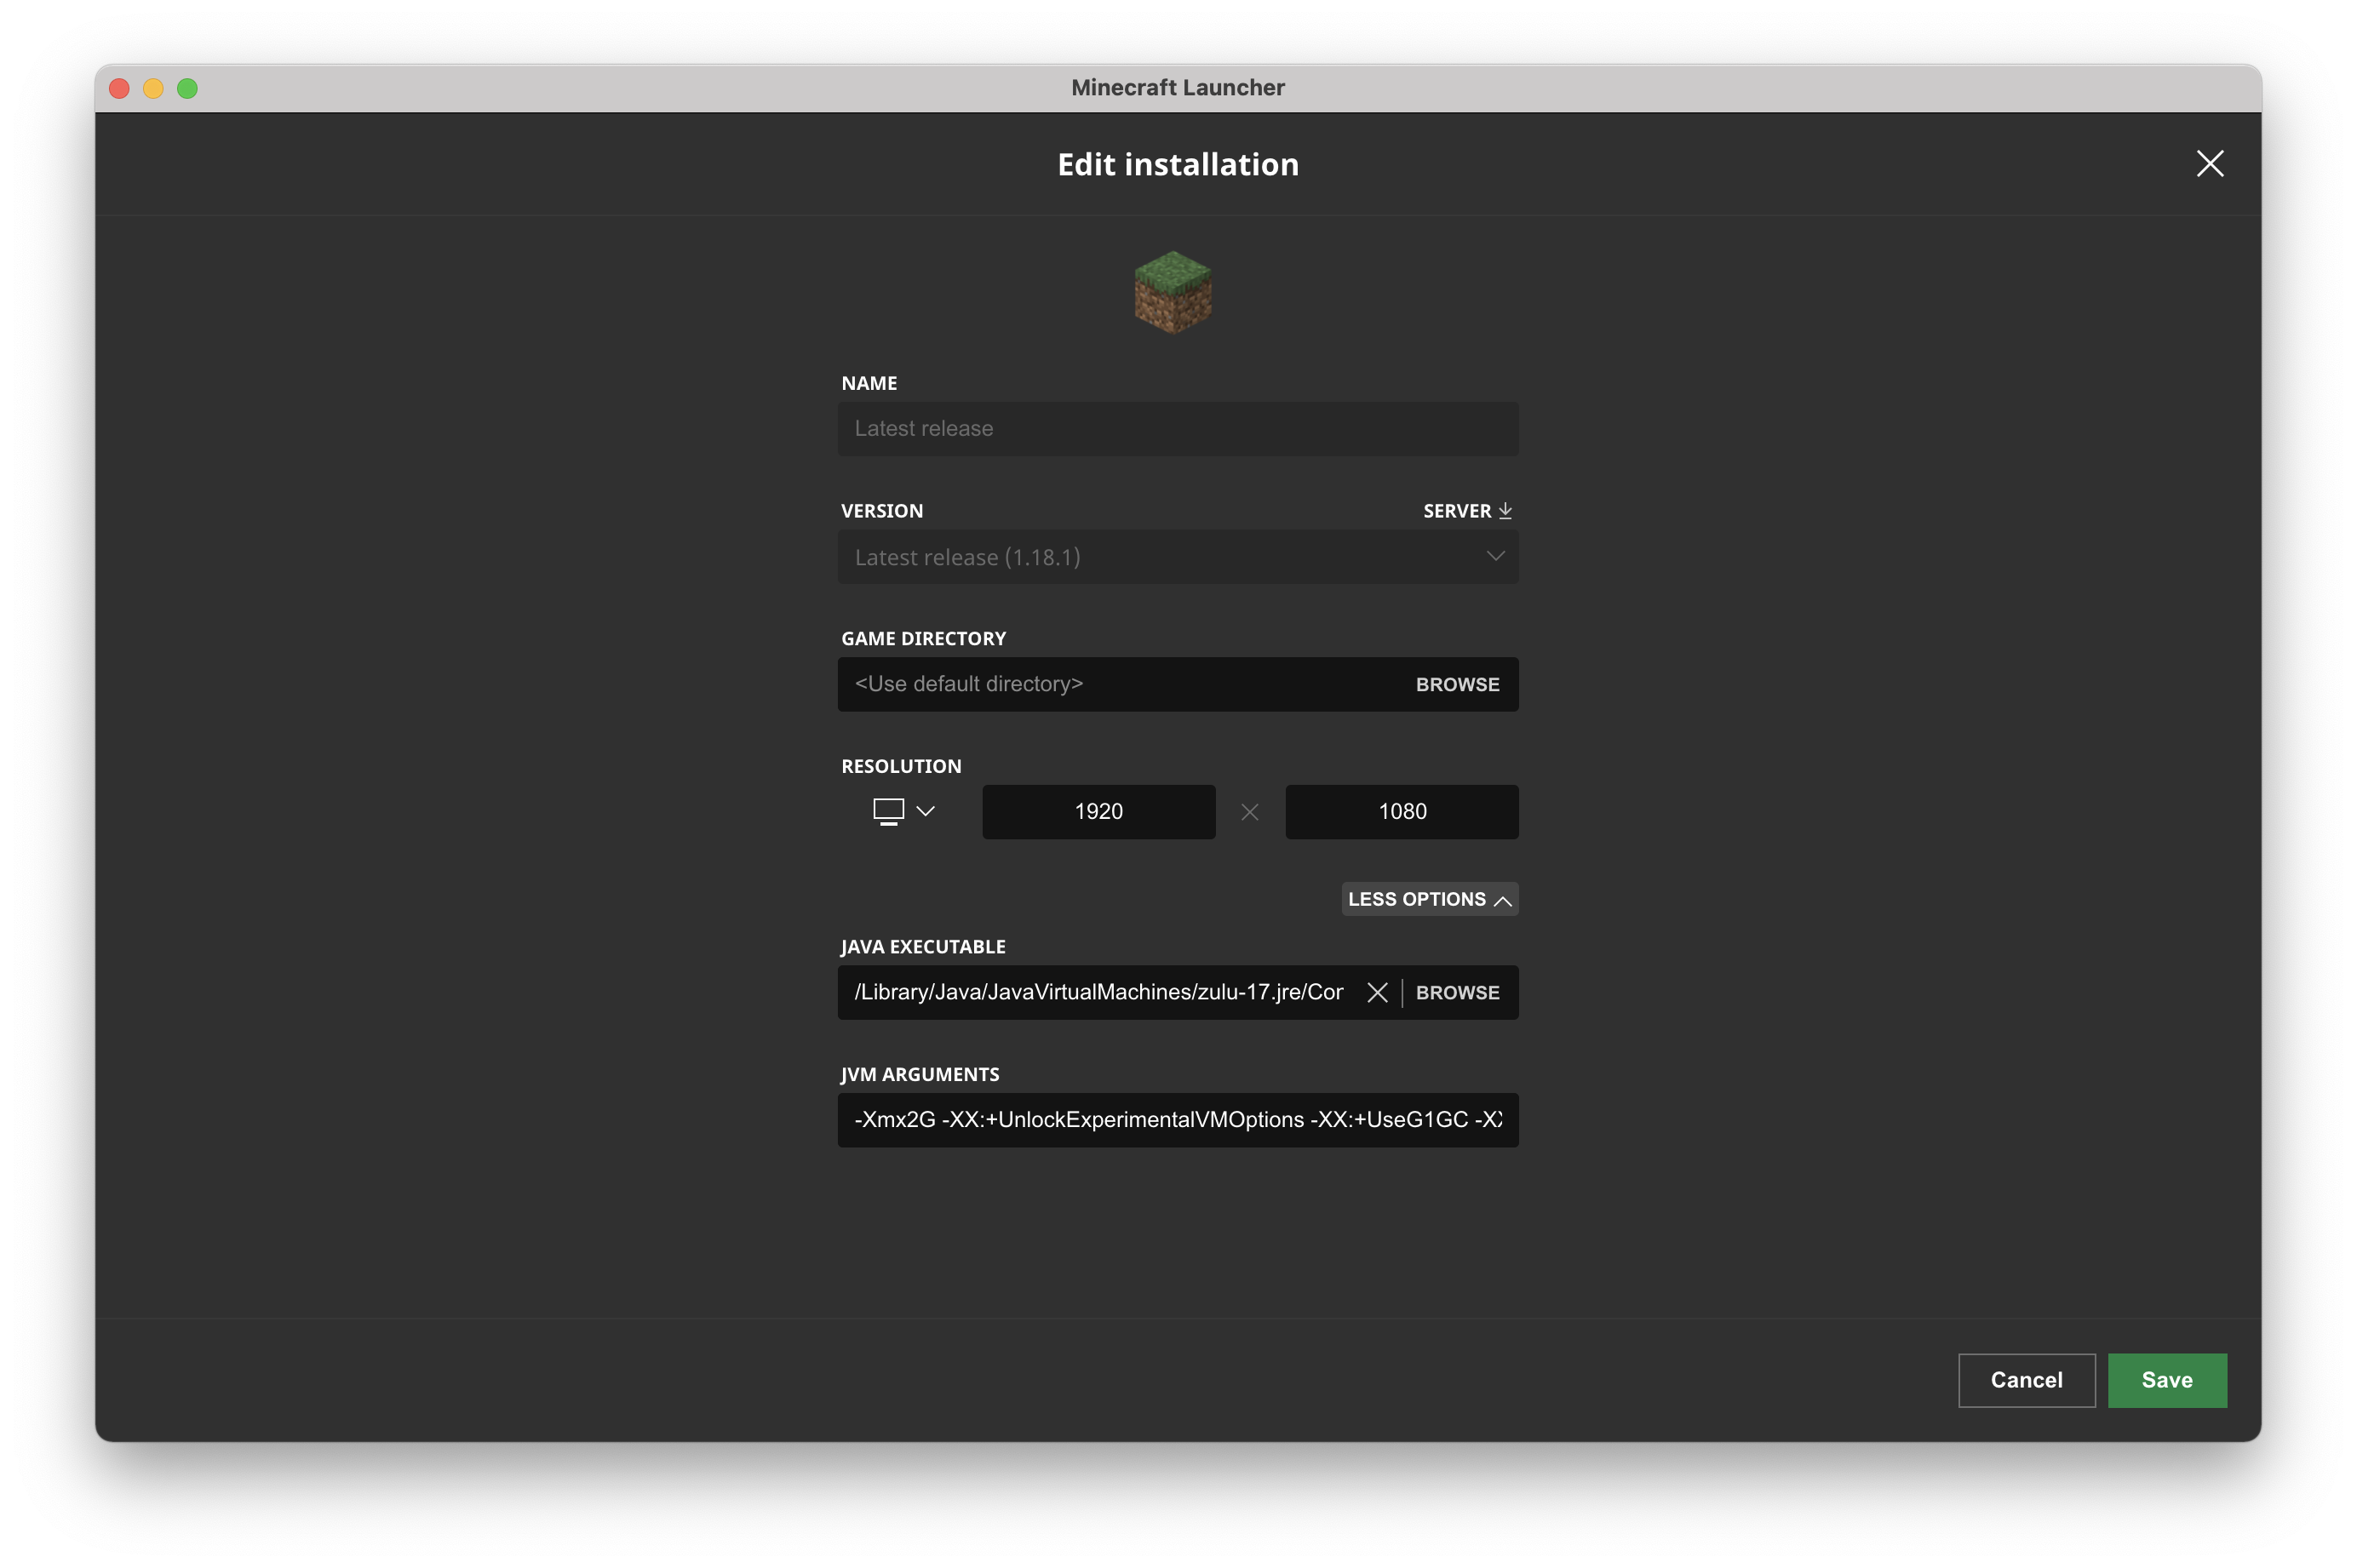
Click Save, and then click Play! Congratulations, you’re done!–uh, wait a minute.
(This is the part where I hope you weren’t actually following along with me, because at this point you’re probably not terribly happy with me.)
Well That Didn’t Work
What do we do now? We didn’t even get a crash report like our last crash to figure out what might
have happened. Fortunately there are still log files we can look at. The logs are in
~/Library/ApplicationSupport/minecraft, and the summary is that one of the libraries that
Minecraft uses for graphics (LWJGL) failed to load. I guess we’ll need to investigate that, now.
At this point, though, we’ve gone about as far as we can (should?) with the official Minecraft launcher. What we need is something that will make it easier to tweak our Minecraft instance’s various Java settings.
Enter MultiMC
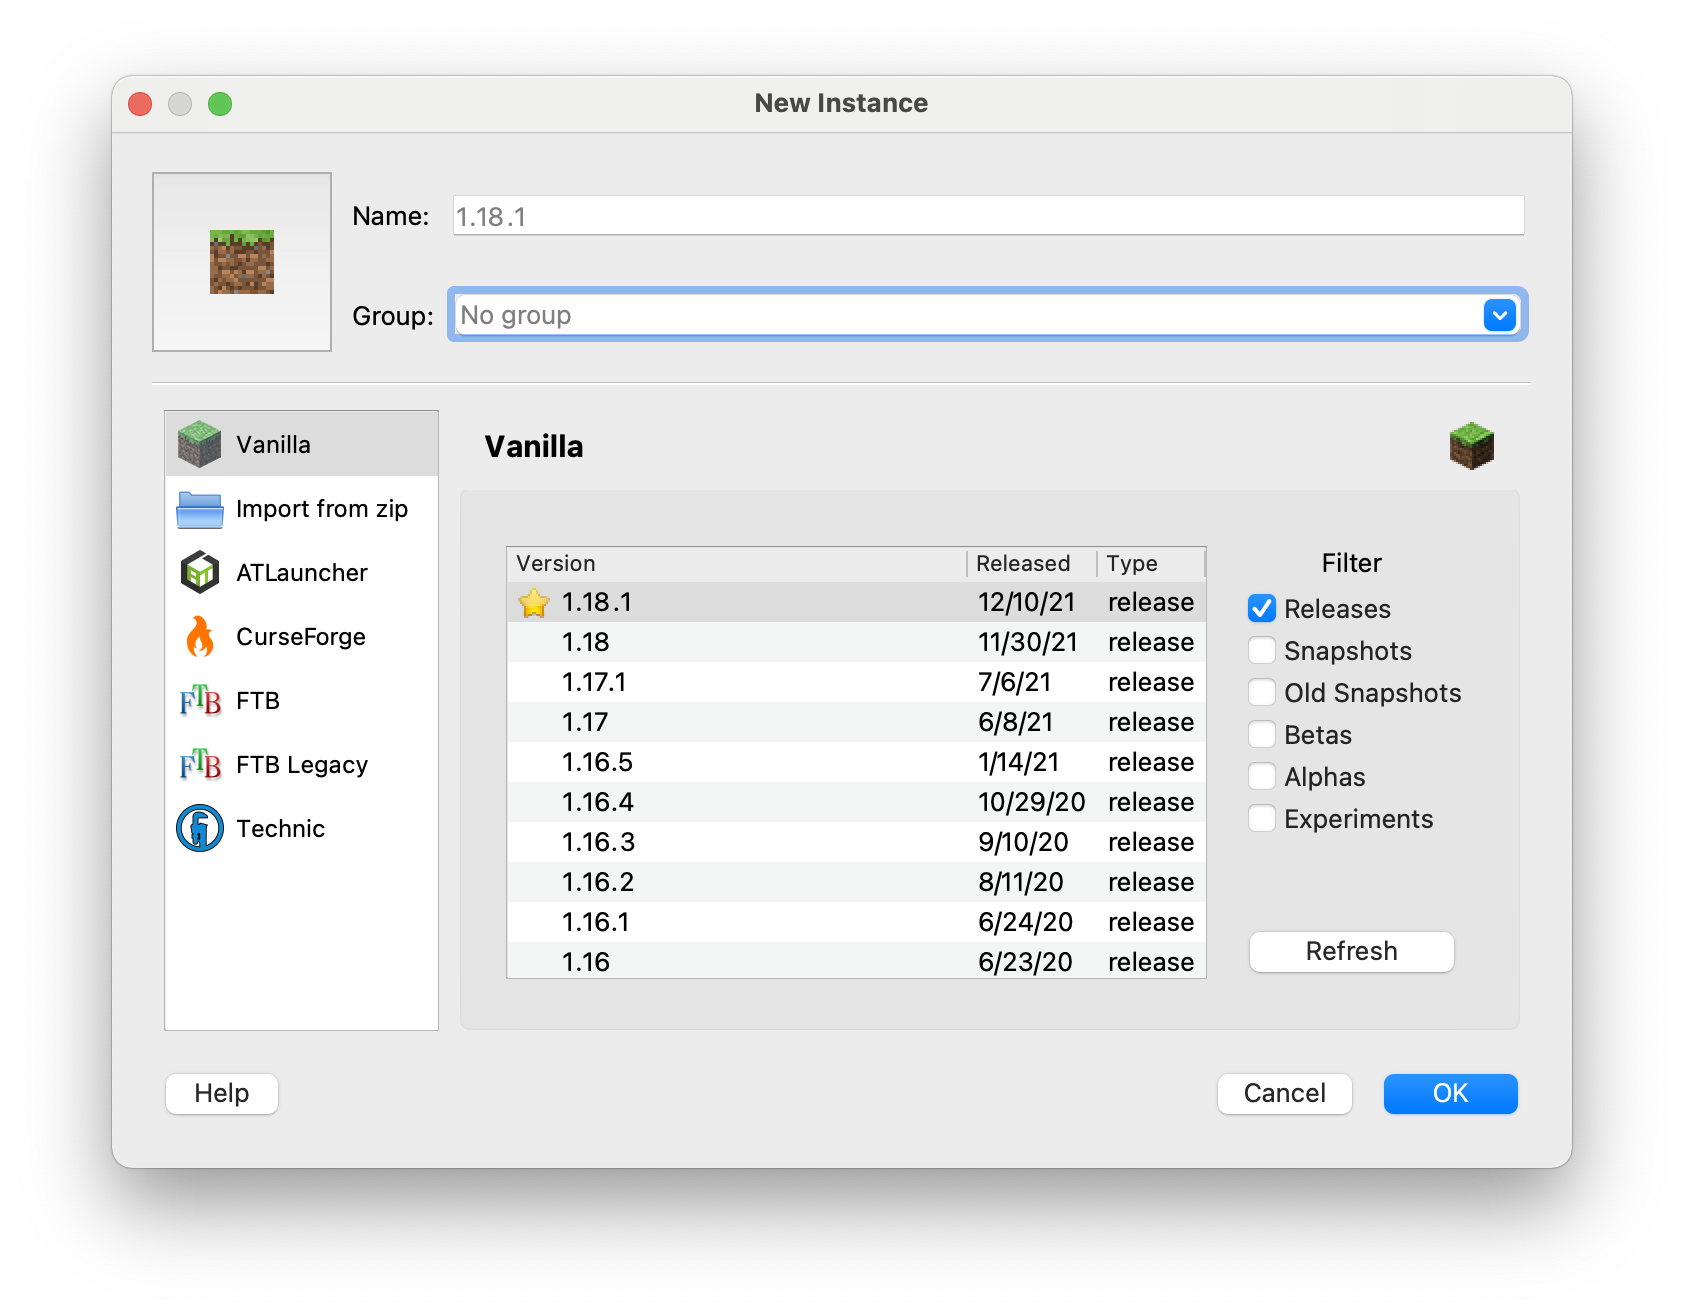
From their website, “MultiMC is an alternative launcher for Minecraft. It allows you to have multiple, cleanly separated instances of Minecraft (each with their own mods, resource packs, saves, etc) and helps you manage them and their associated options with a simple and powerful interface.” On the left-hand side of the MultiMC main page, find the “Download & Install” link, then choose to download the “Mac OS X” version (direct link). Double-click the file and it will unpack the MultiMC app. You can drag that into your Applications folder (or wherever else you want to put it). Once you have it installed, open the app and create a new Minecraft instance by clicking the “Add instance” button. Choose “1.18.1” as the version, give it a name if you like and click OK.
Now we can start customizing our new install. First we need to ensure the instance runs with the proper Java version–which, in the case of 1.18, is Java 17. (Other Minecraft versions require different versions of Java, which is beyond the scope of this post.) Since we downloaded one for our previous (failed) attempt using the Minecraft launcher, we’ll use that one.
If you only have a single JVM installed, MultiMC will probably do the right thing and automatically use it. If you have multiple JVMs installed–say, you want to play vanilla Minecraft 1.18 as well as an older 1.16 or 1.12 world–then you’ll need to tell MultiMC which JVM to use for each instance.
Select the instance icon in the middle pane and click “Edit instance” in the menu on the right-hand side. In the window that appears, click Settings on the left.
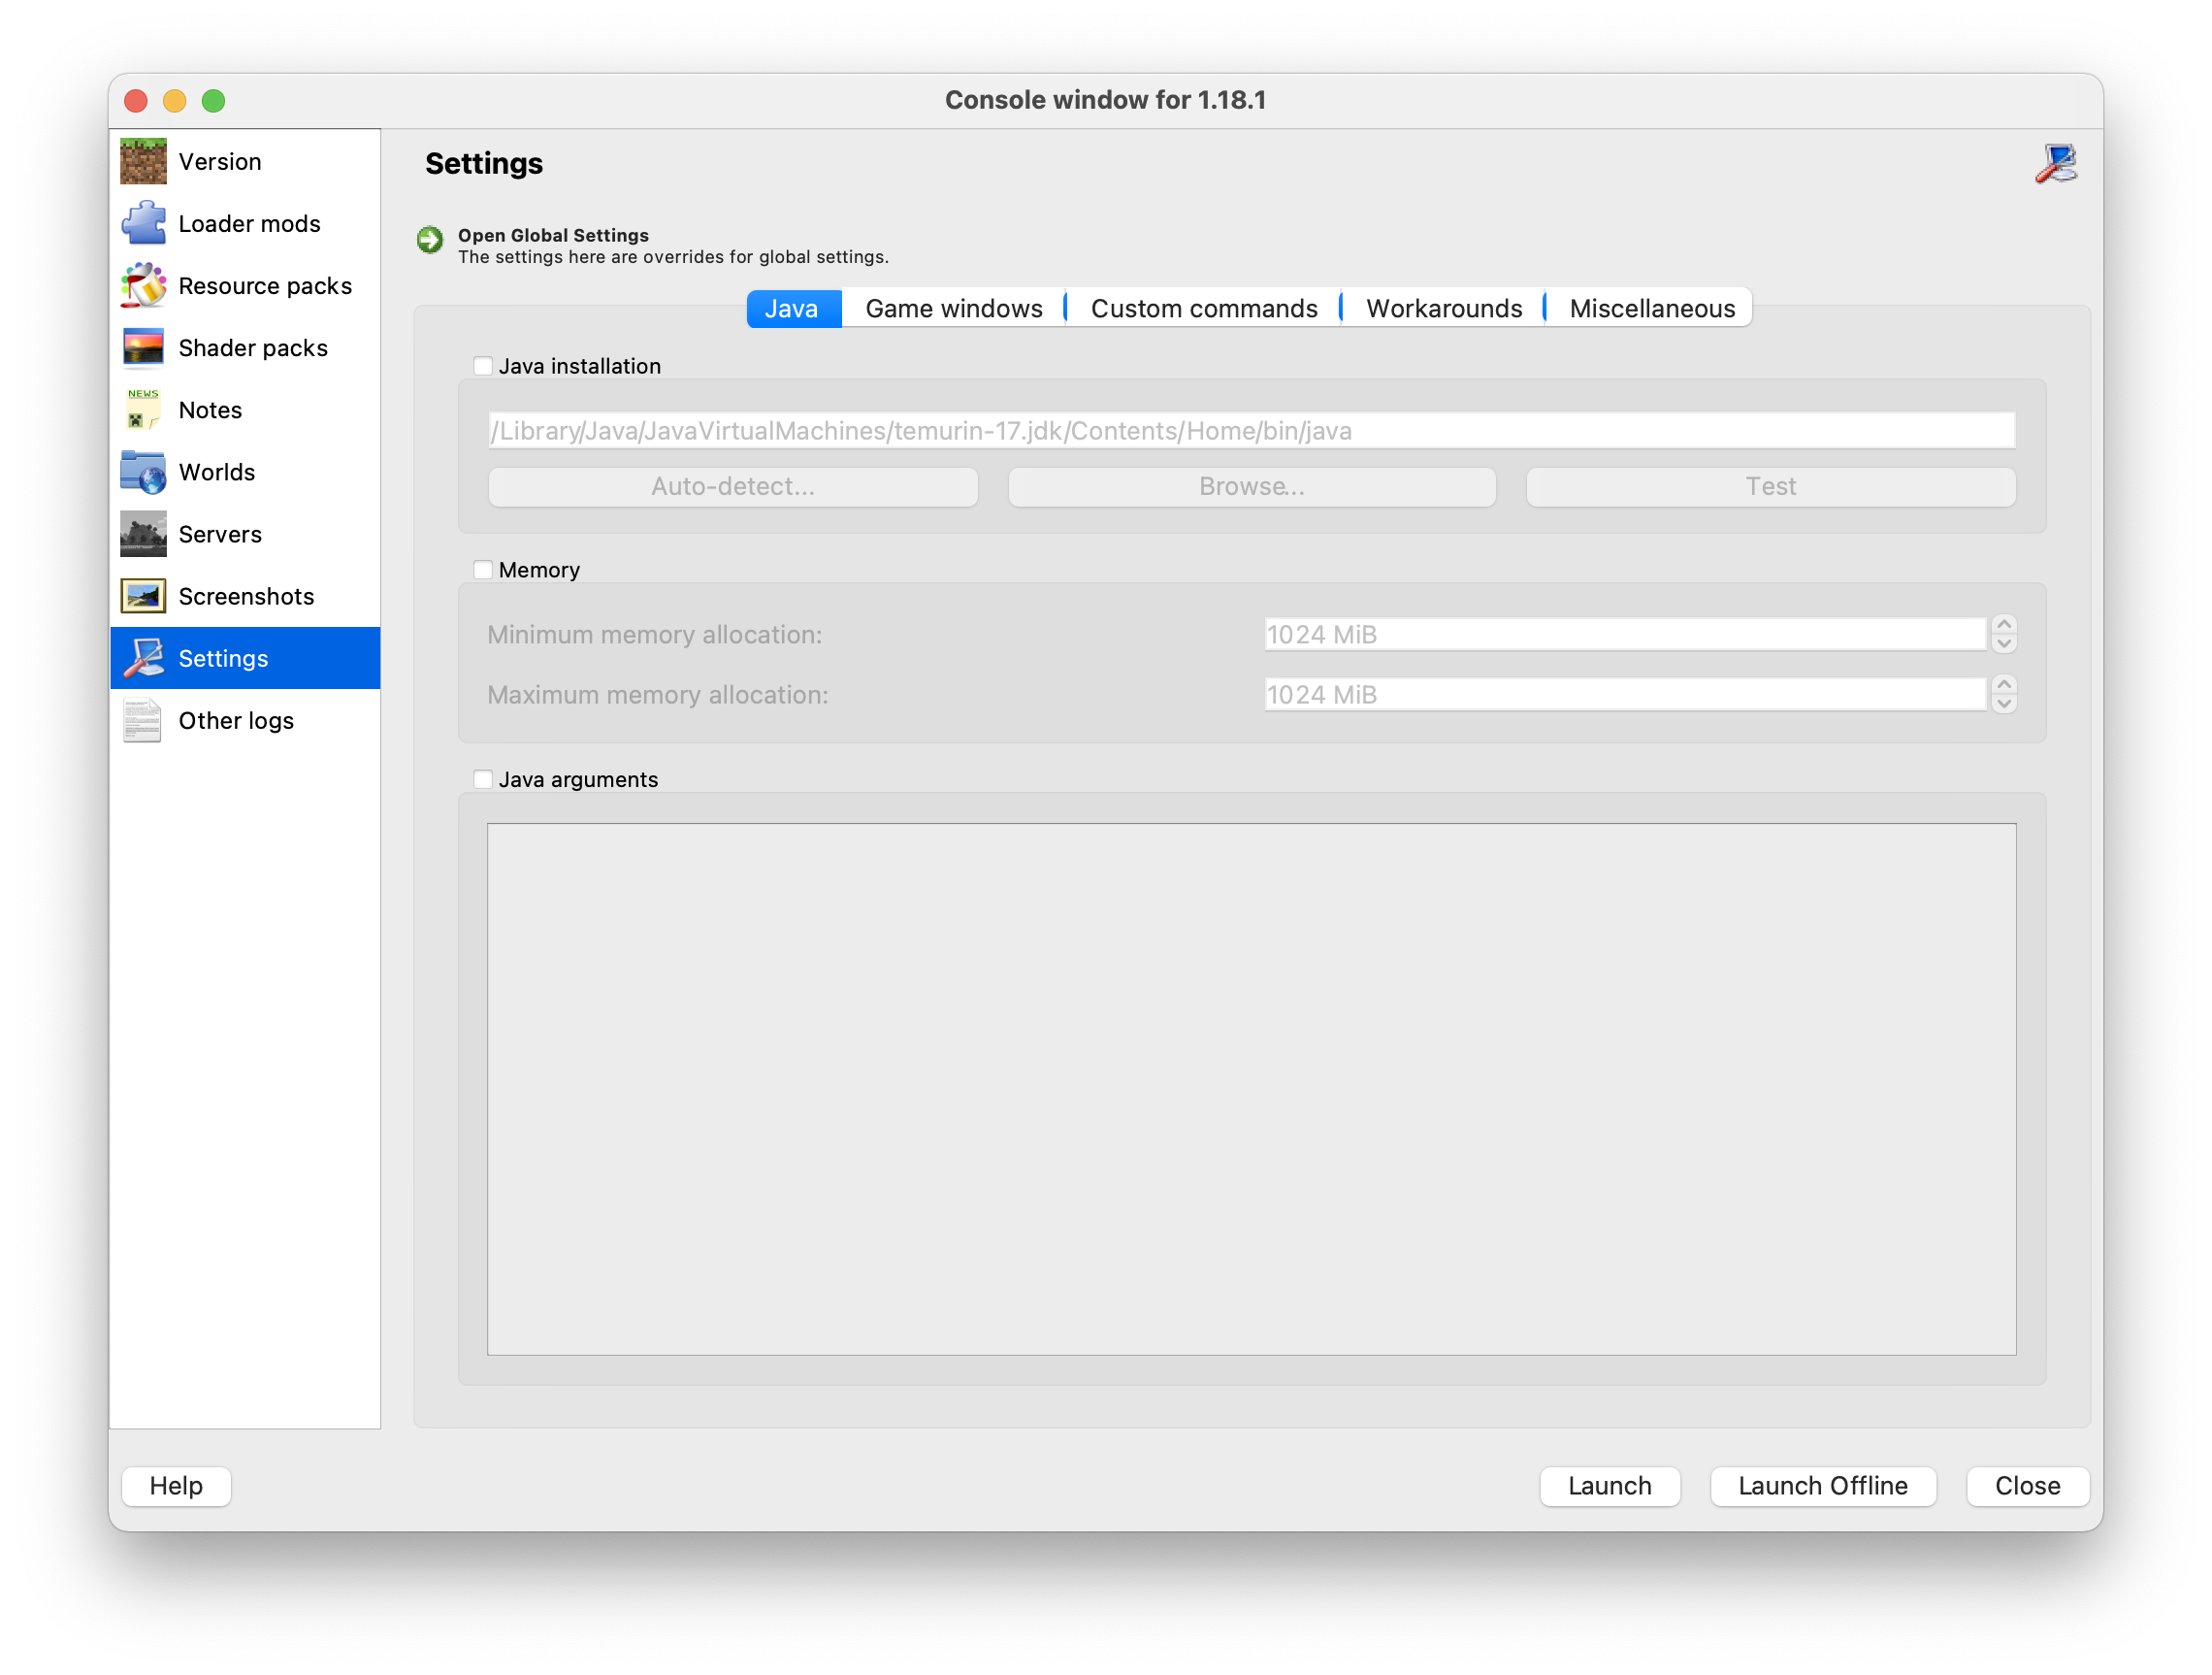
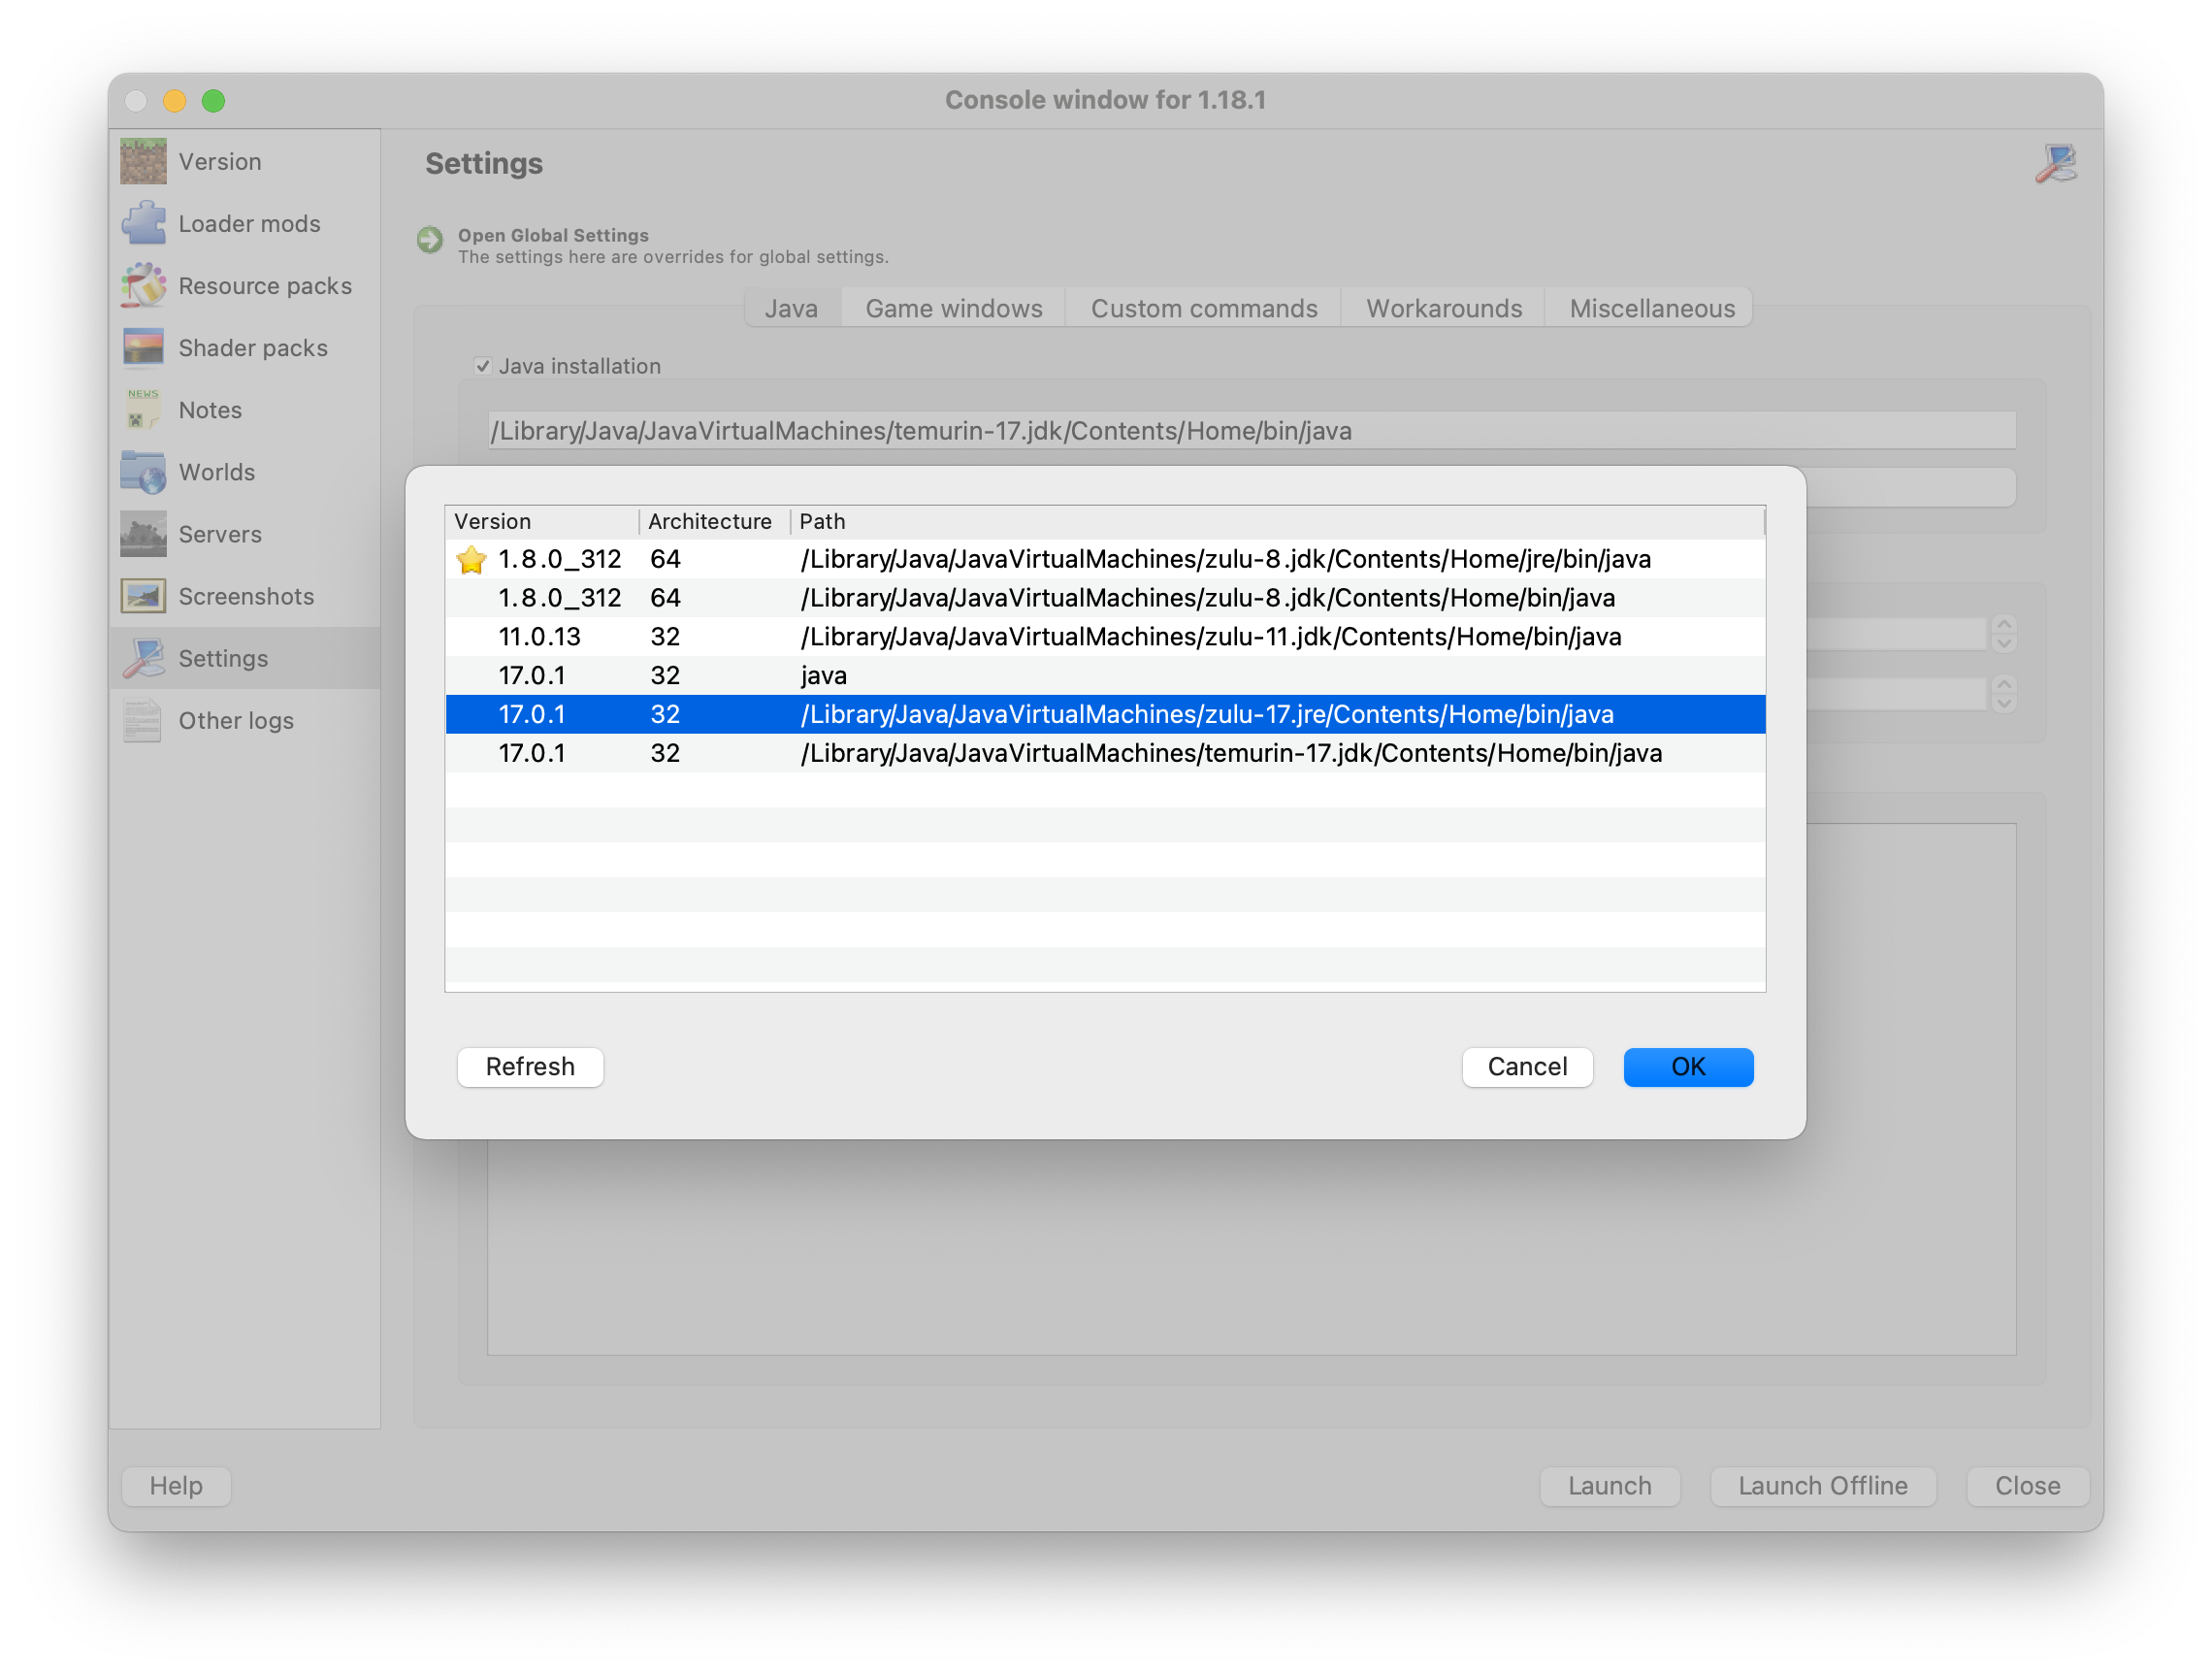
Select the checkbox next to “Java installation”. If the path that appears isn’t correct, you can click “Auto-detect” and choose the correct one. (Remember: for 1.18 we’re looking for Java 17.)
At this point, we’ve set up MultiMC the same way as our failed official Minecraft launcher experiment…which means that if you started your new instance now, it would most likely result in the same failure we saw earlier. We now have to tackle that LWJGL error.
That LWJGL Error
To make a long story, uh, less long, the LWJGL Java library also includes “native” code (i.e., not Java bytecode) that needs to match the architecture of the JVM that loads it. In other words, if you want to load the LWJGL library into a JVM compiled for Intel Macs, you will not only need the (processor-agnostic) Java components of the library, but also some library files compiled for Intel processors; similarly, if you run the Arm-compiled JVM, you’ll need LWJGL libraries compiled for the M1 (Arm-based) processor.
Can you guess where our crash is coming from? If you guessed “Minecraft bundles Intel-only versions of the LWJGL natives and we’re trying to run an Arm JVM to avoid the Rosetta 2 tax,” you guessed right!
So, where do we get these native libraries? From the official LWJGL website, of course. They provide a neat way to download a customized version of the LWJGL library files. To make it easy, you can load this config and then click “Download”. After a bit, you’ll get a ZIP file of all the resources you requested. Find this file in Finder and double-click it to unzip it into a folder named “lwjgl-release-3.3.0-custom”.
At this point, you’ll need to open Terminal.app (or your favorite terminal app) so you can run some things on the command line. What we’re going to do is take all of the JAR files in that ZIP file we downloaded, extract them all into a single base directory, and repack them into a single JAR file. (Why do this? To make it easier for us, as we only have to specify a single JAR file to add to the Java classpath.)
$ pwd
/Users/seth/Downloads/lwjgl-release-3.3.0-custom
$ mkdir -p extracted
$ cd extracted/
$ for f in ../*.jar; do jar -xf "$f"; done
$ jar cf ../../lwjgl-release-3.3.0.jar .
$ ls -lah ../../lwjgl-release-3.3.0.jar
-rw-r--r--  1 seth  staff    18M Dec 26 19:19 ../../lwjgl-release-3.3.0.jar
At the end of this you will have a file called lwjgl-release-3.3.0.jar in the same directory where
the downloaded ZIP file exists. The last step of this process is to move that file into a directory
where MultiMC can find it, and then tell MultiMC to use it.
Back in MultiMC, select your 1.18 instance again and click “Edit instance” just as before. This time click the “Version” tab on the left.
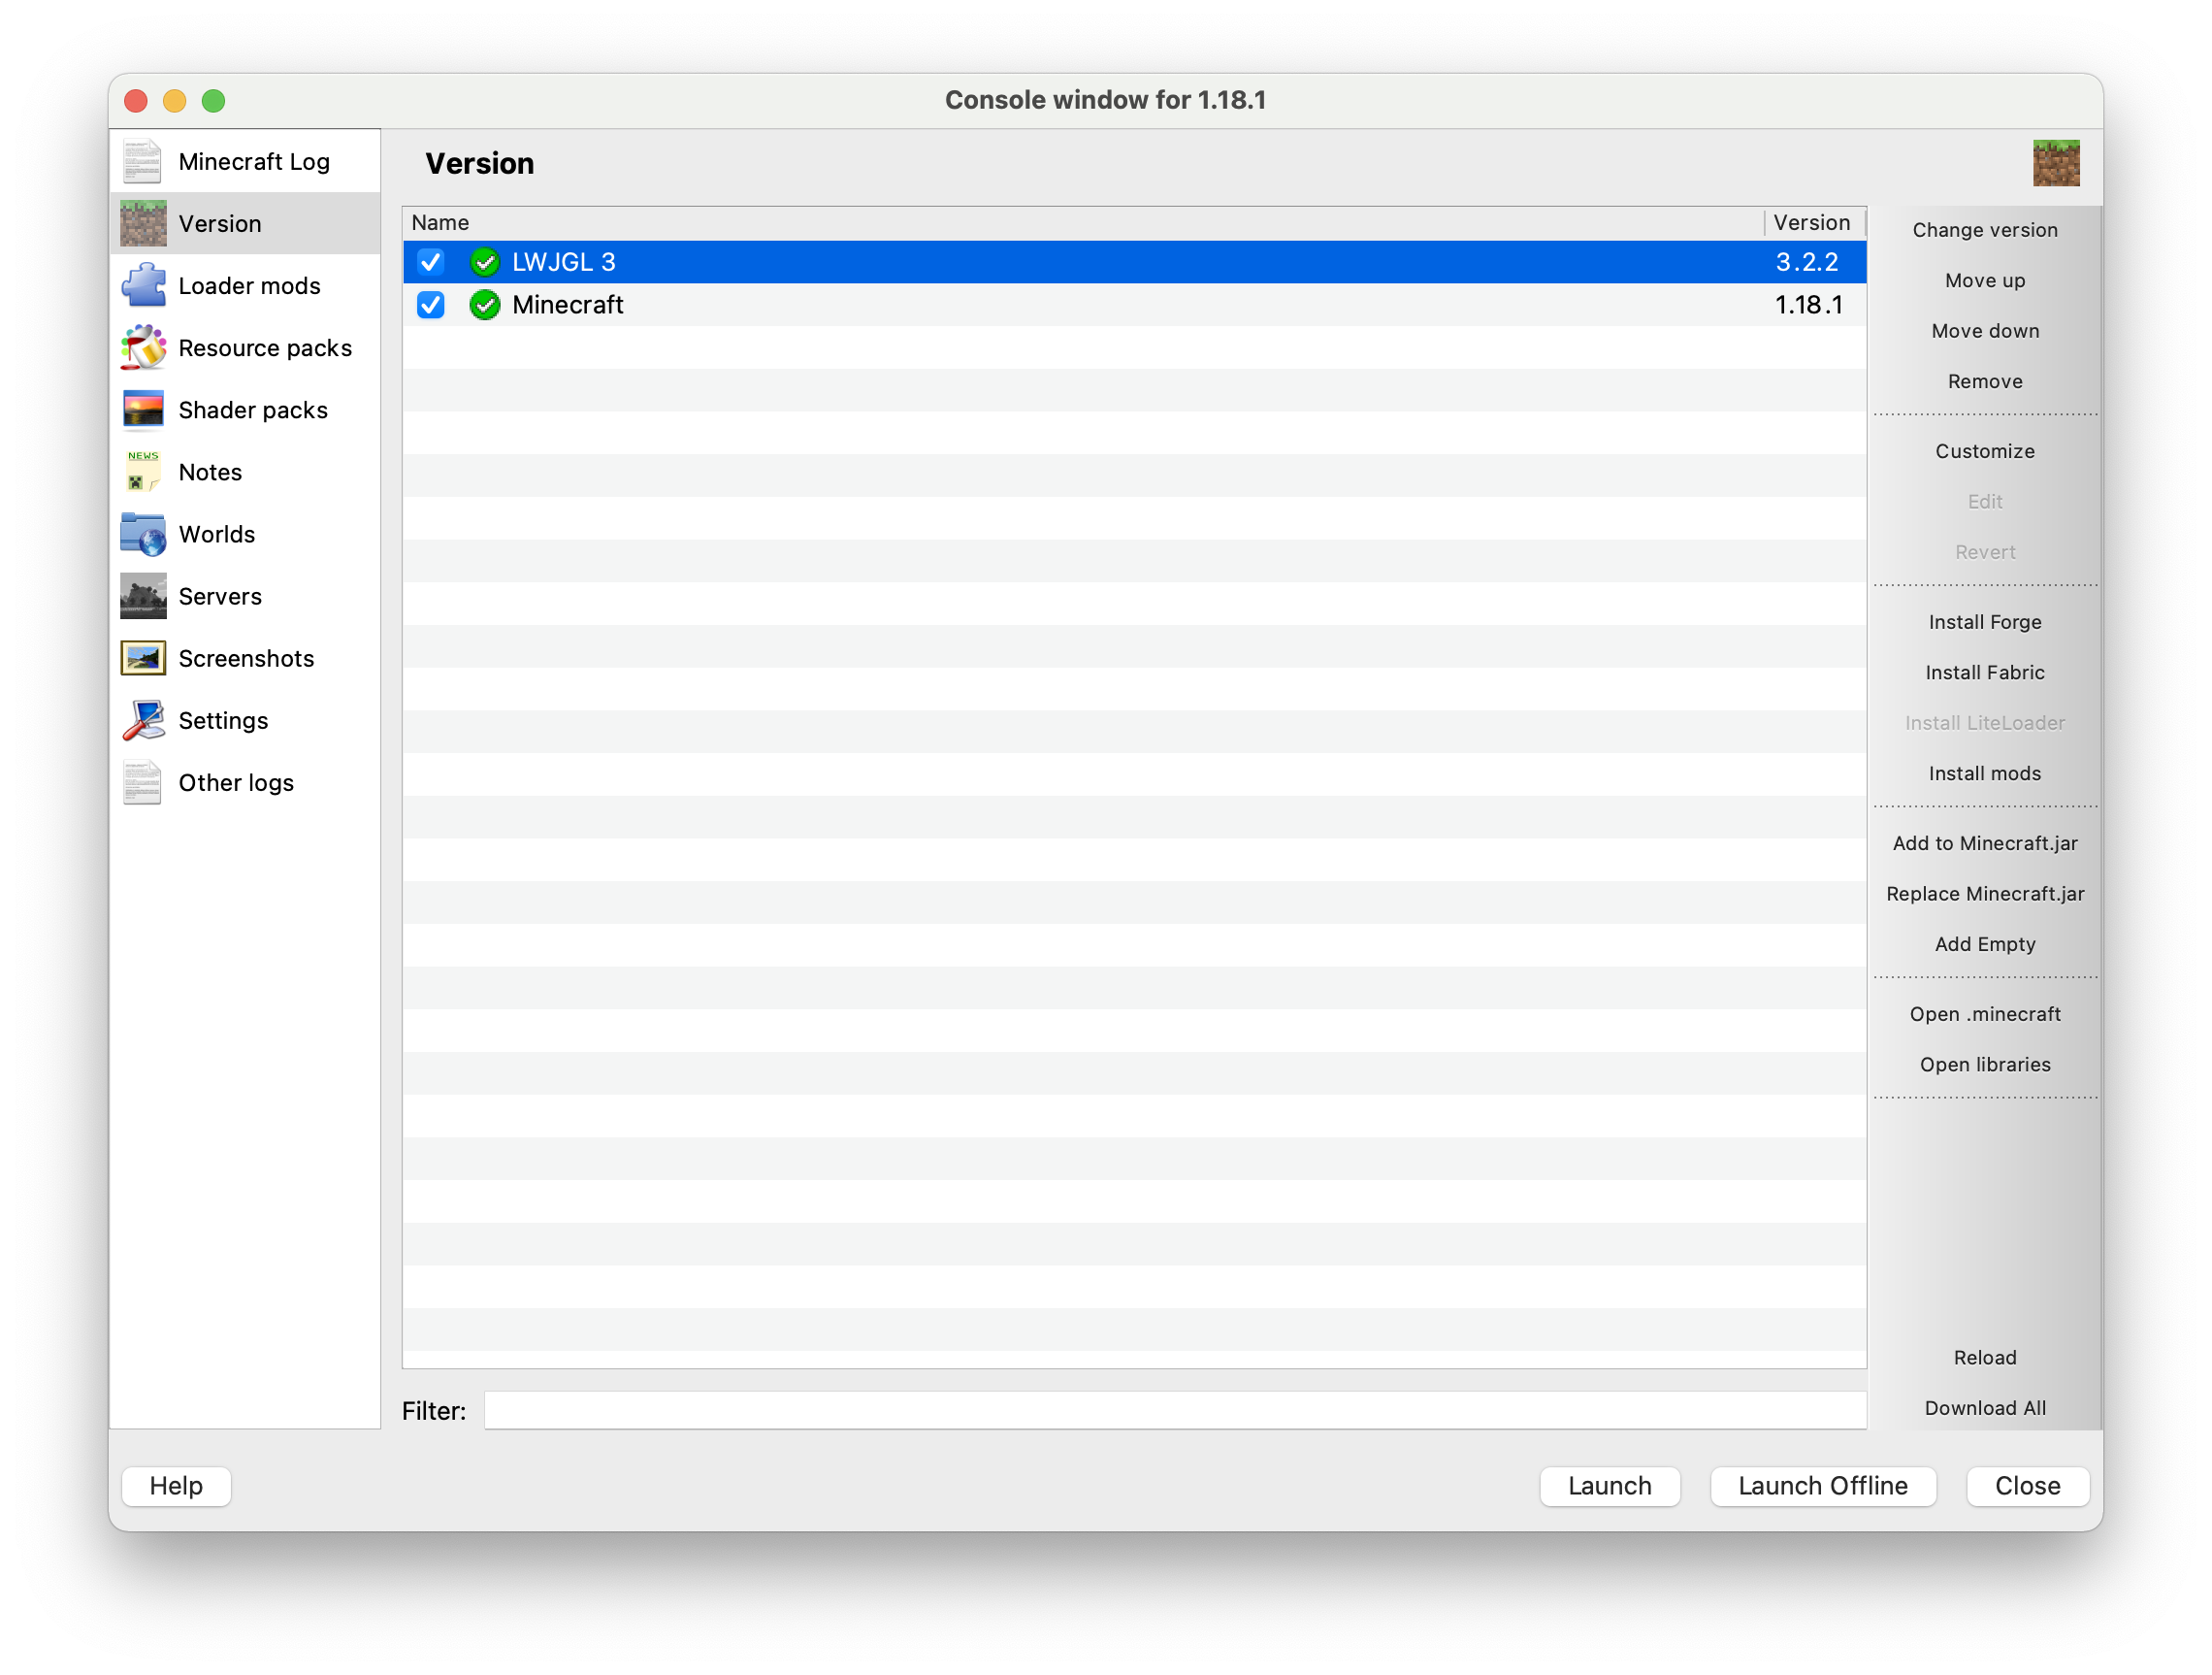
See that line for LWJGL 3? We need to edit that. Click the “Customize” button on the right side, then click “Edit”. This should bring up a TextEdit window with some default JSON stuff in it. Select everything, delete it, and then paste the following into the window instead:
{
    "formatVersion": 1,
    "libraries": [
        {
            "name": "lwjgl:lwjgl-release-3.3.0:1",
            "MMC-hint": "local",
            "MMC-filename": "lwjgl-release-3.3.0.jar"
        }
    ],
    "name": "LWJGL 3",
    "releaseTime": "2019-06-24T12:52:52+00:00",
    "type": "release",
    "uid": "org.lwjgl3",
    "version": "3.3.0"
}
That tells MultiMC to use the JAR file we created instead of its defaults. With that done, we now
need to move our new JAR file into the right place. Close the TextEdit window and, back in MultiMC,
click the “Open libraries” button on the right. It will open a Finder window. Move (or copy and
paste) the lwjgl-release-3.3.0.jar we created earlier into this directory. Close the Finder
window.
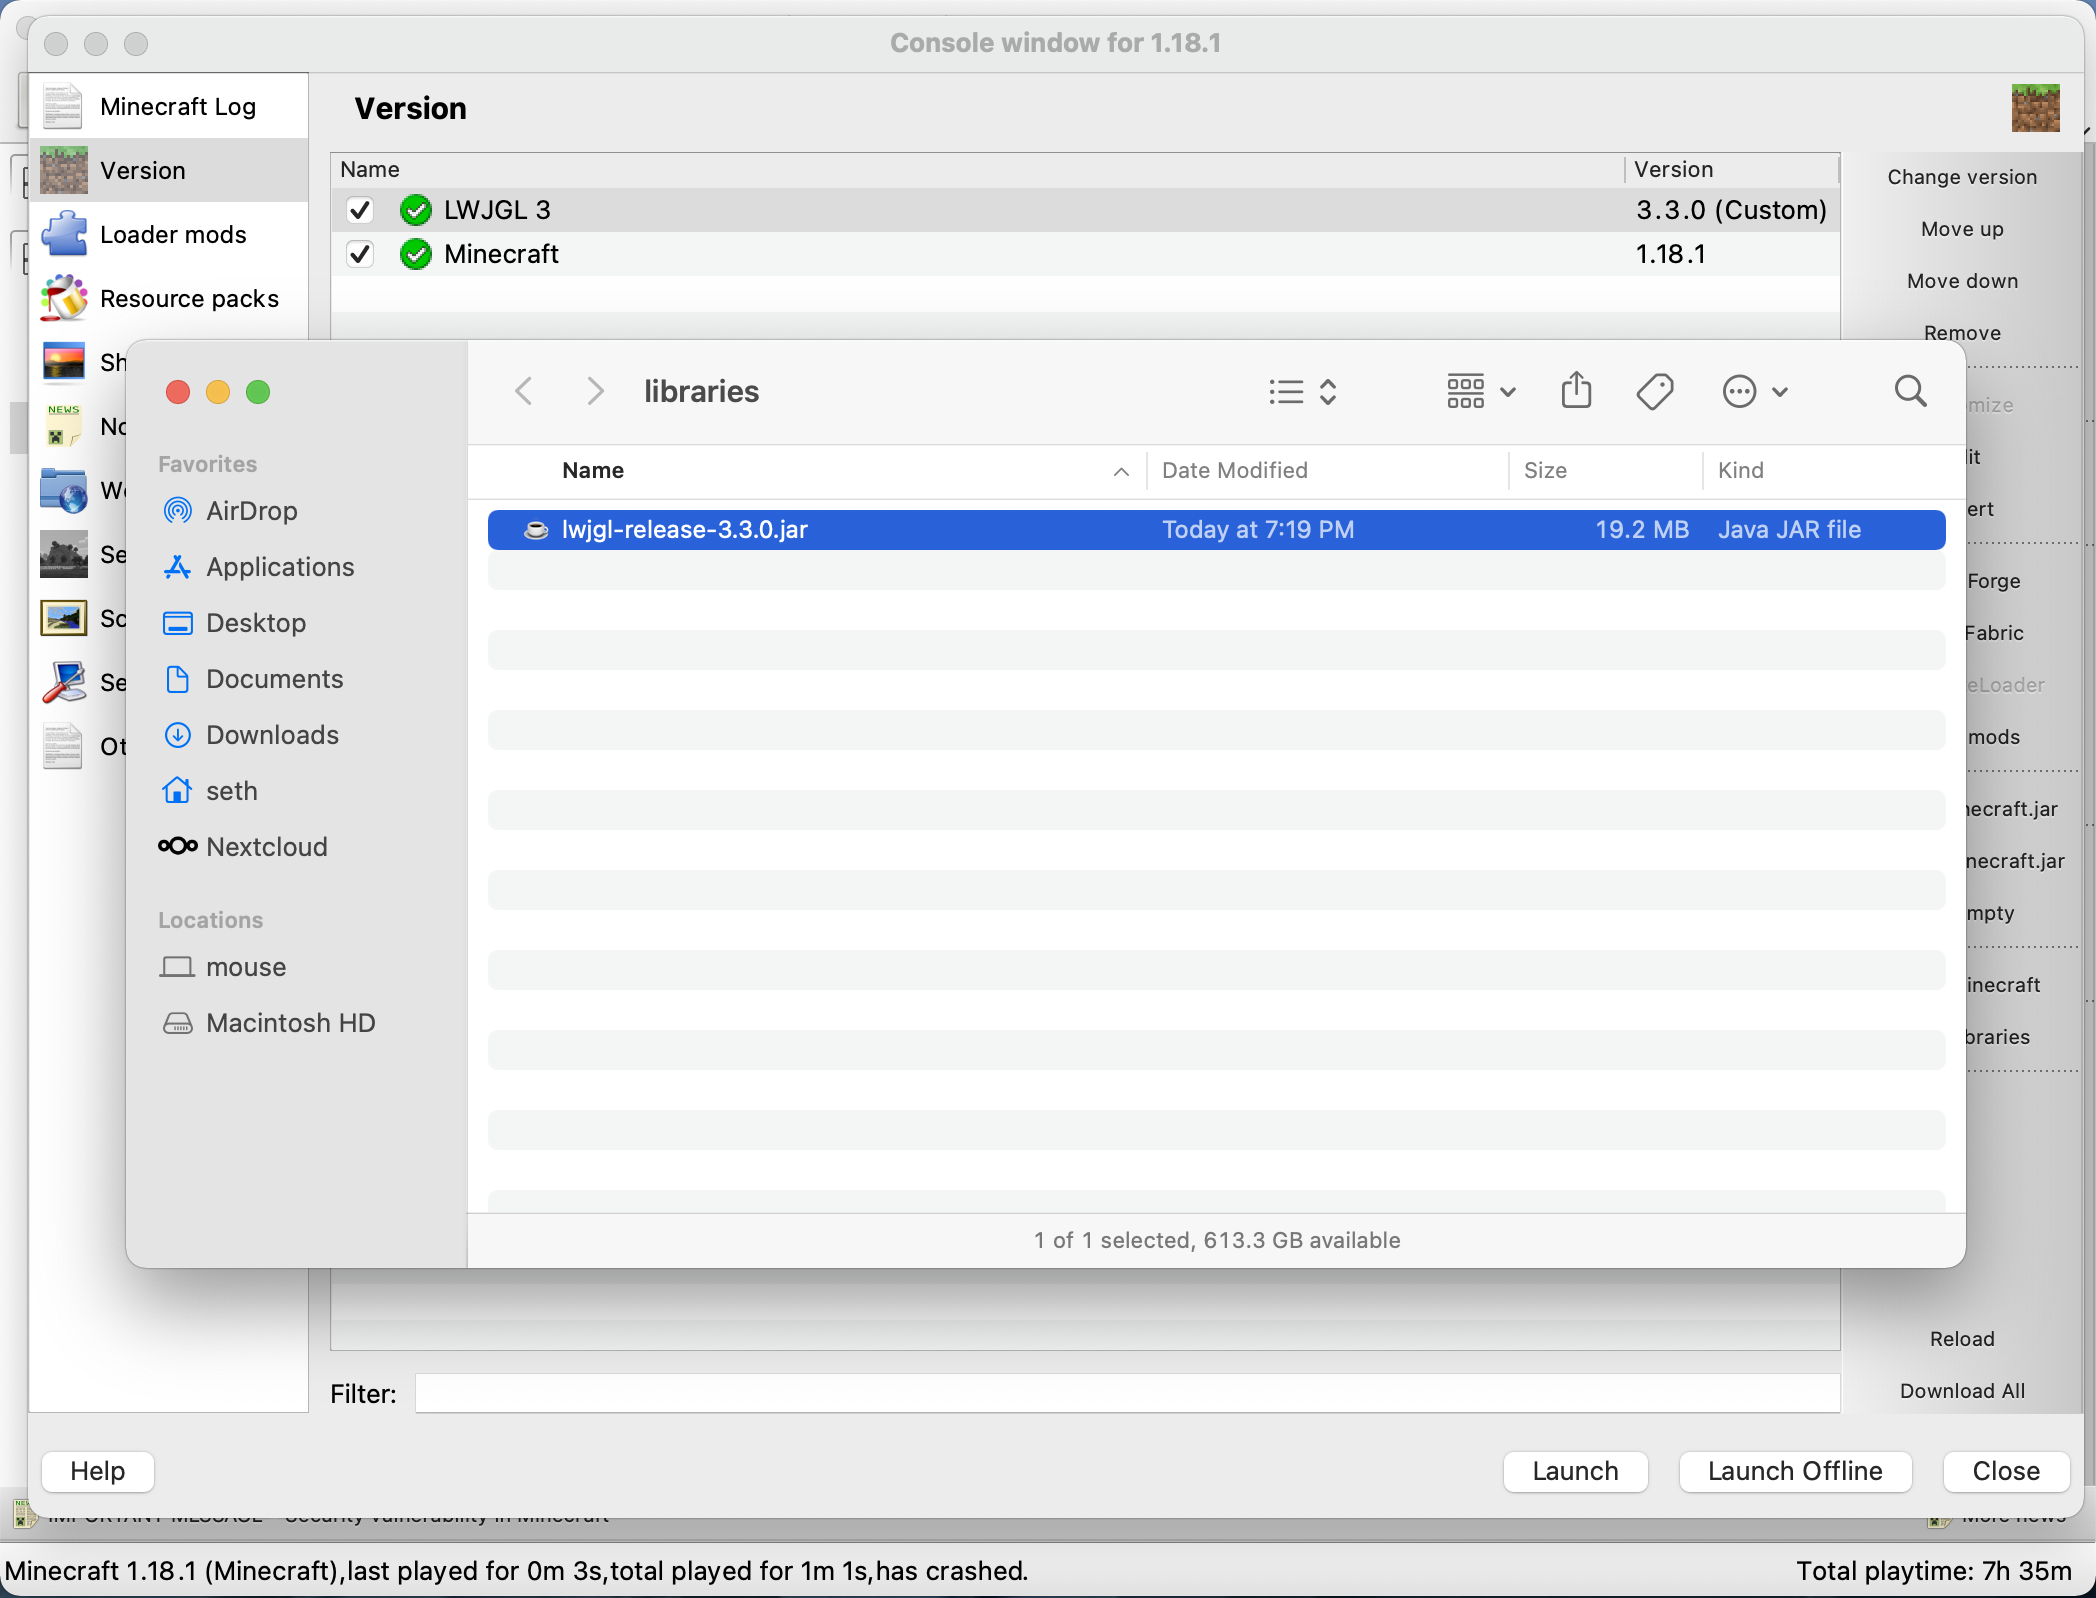
Let’s go ahead and click the “Launch” button in the lower right and see what happens. Cross our fingers, and…
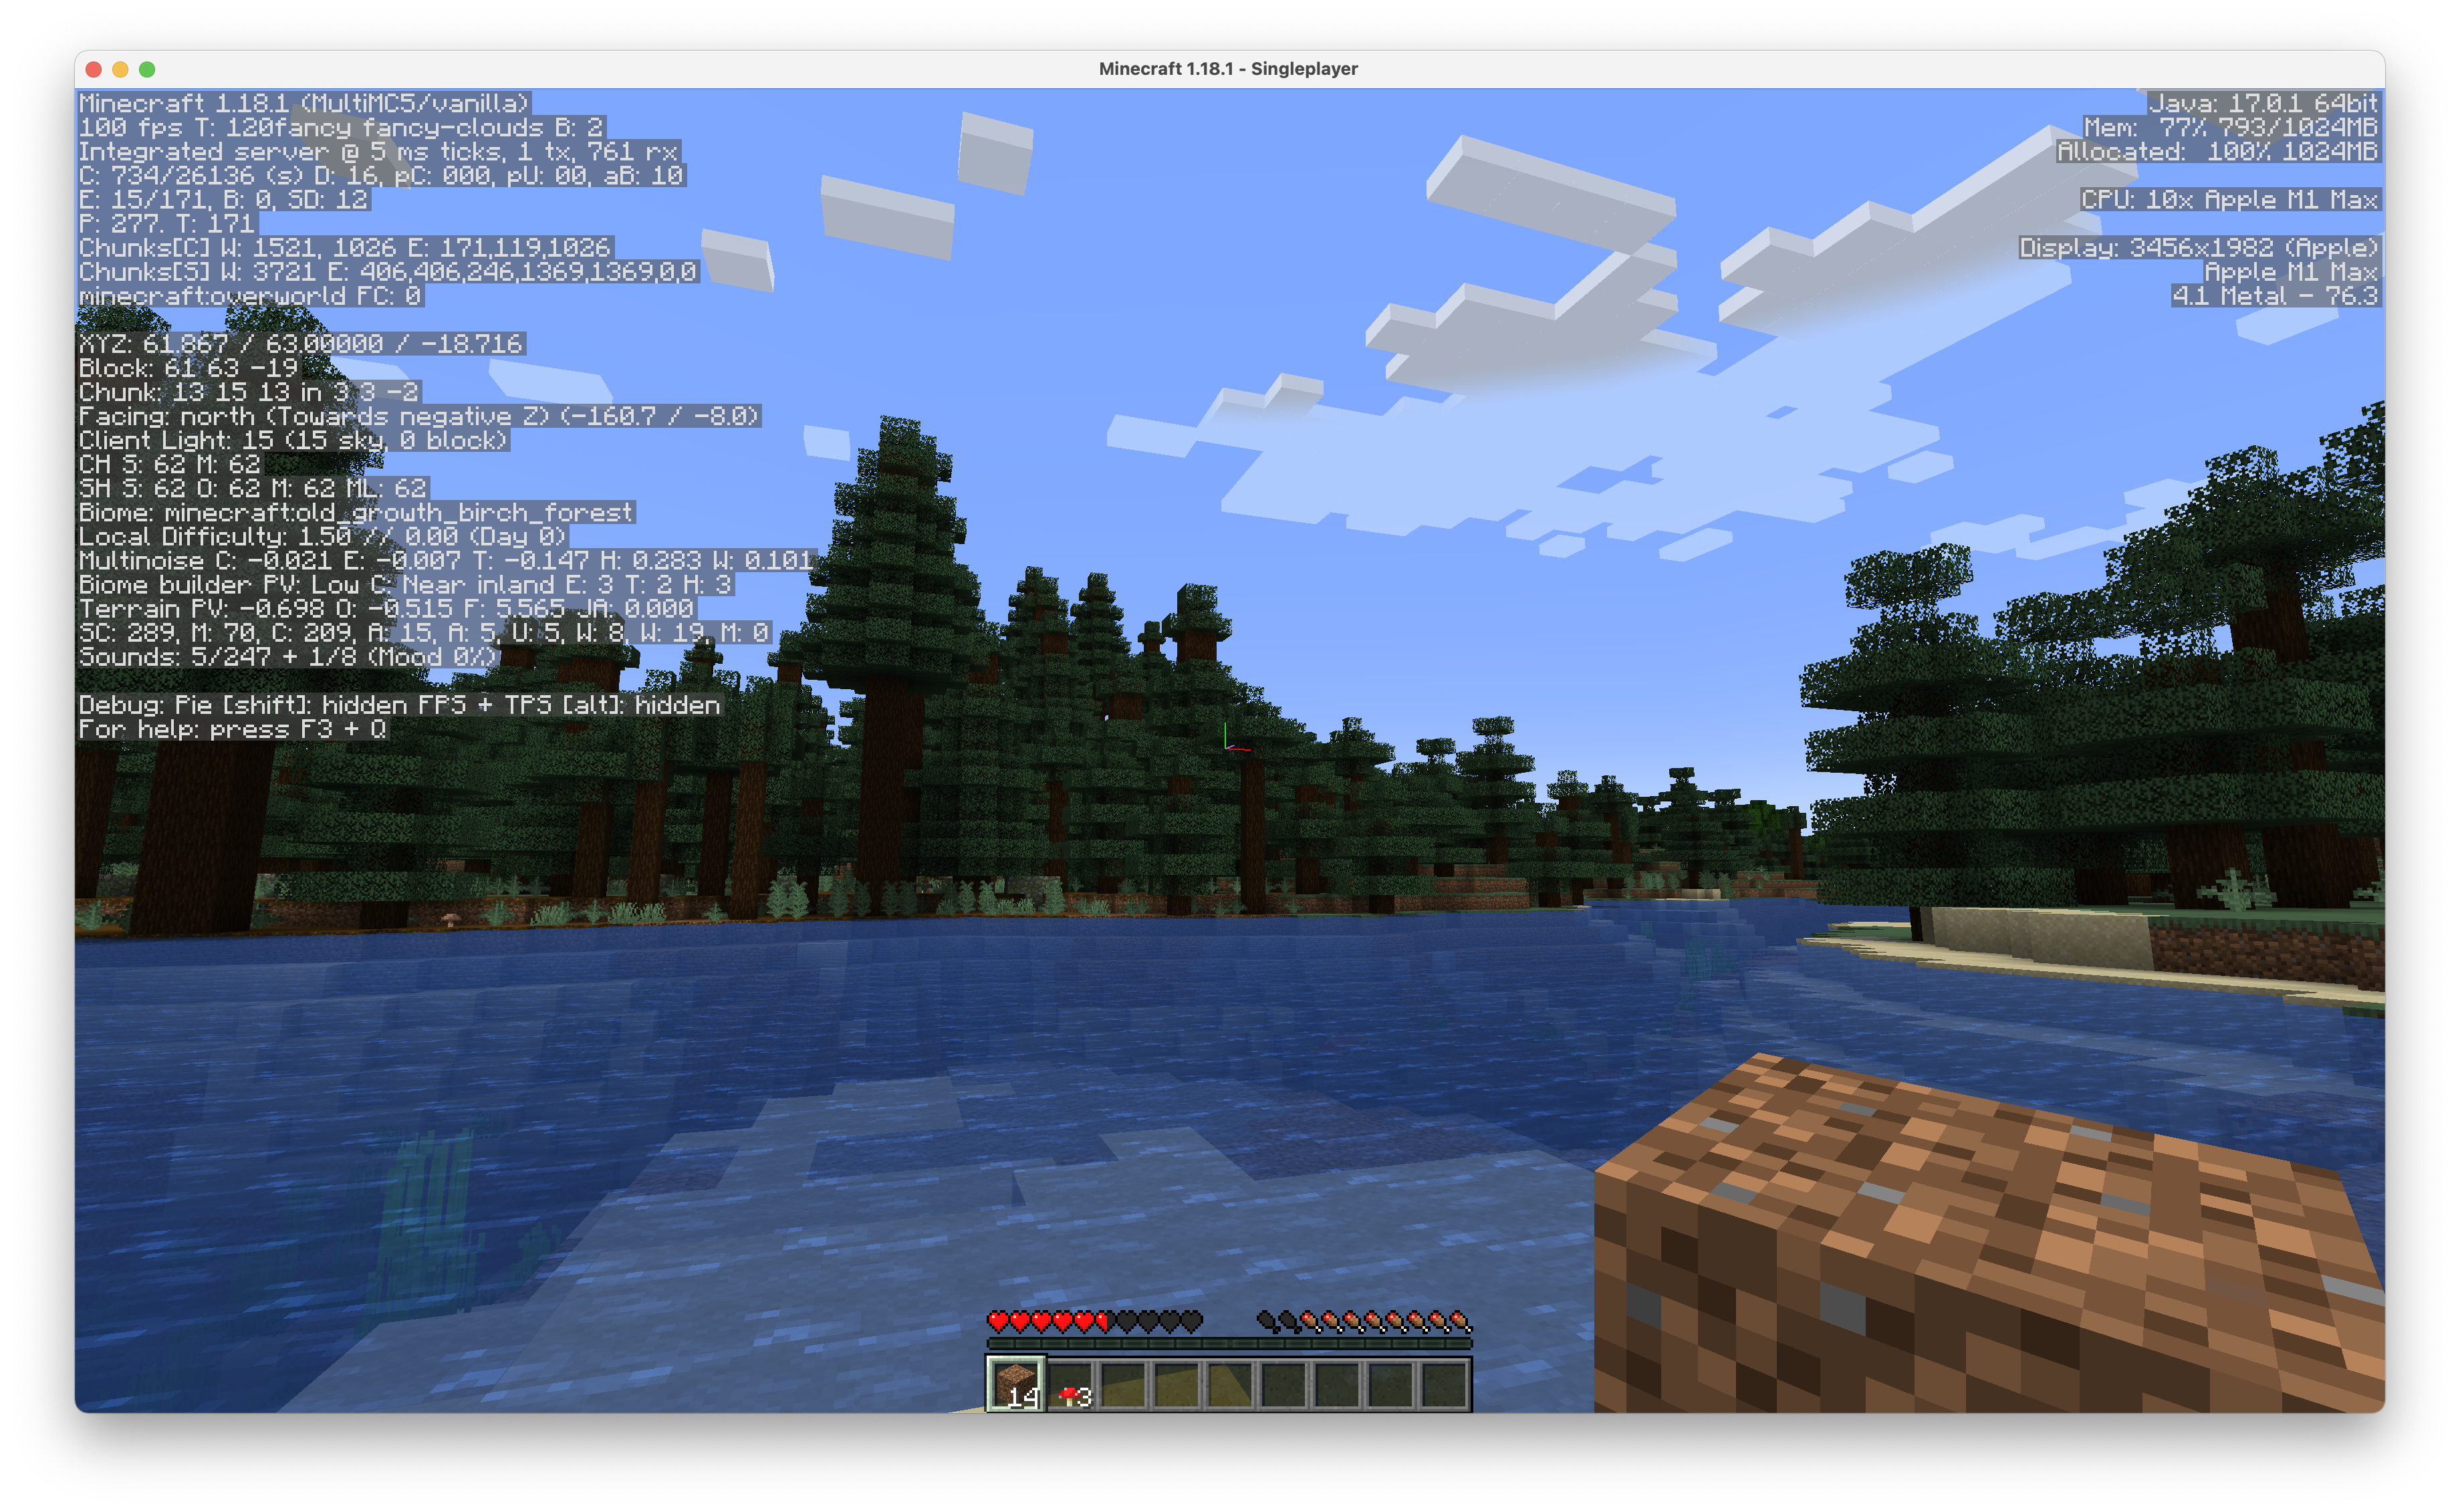
Whoa, success! And we’ve gained about 40 frames per second after all this for an average of around 100fps. Not bad! Let’s go into our Minecraft video settings and make this window full-screen so we can see it in all its glory–
Uh, wait a minute.

*ahem*
Okay. So at least we’ve made progress, right? That’s a thing that’s happened.
Break Out Your Compiler
In for a penny, in for a pound, right?
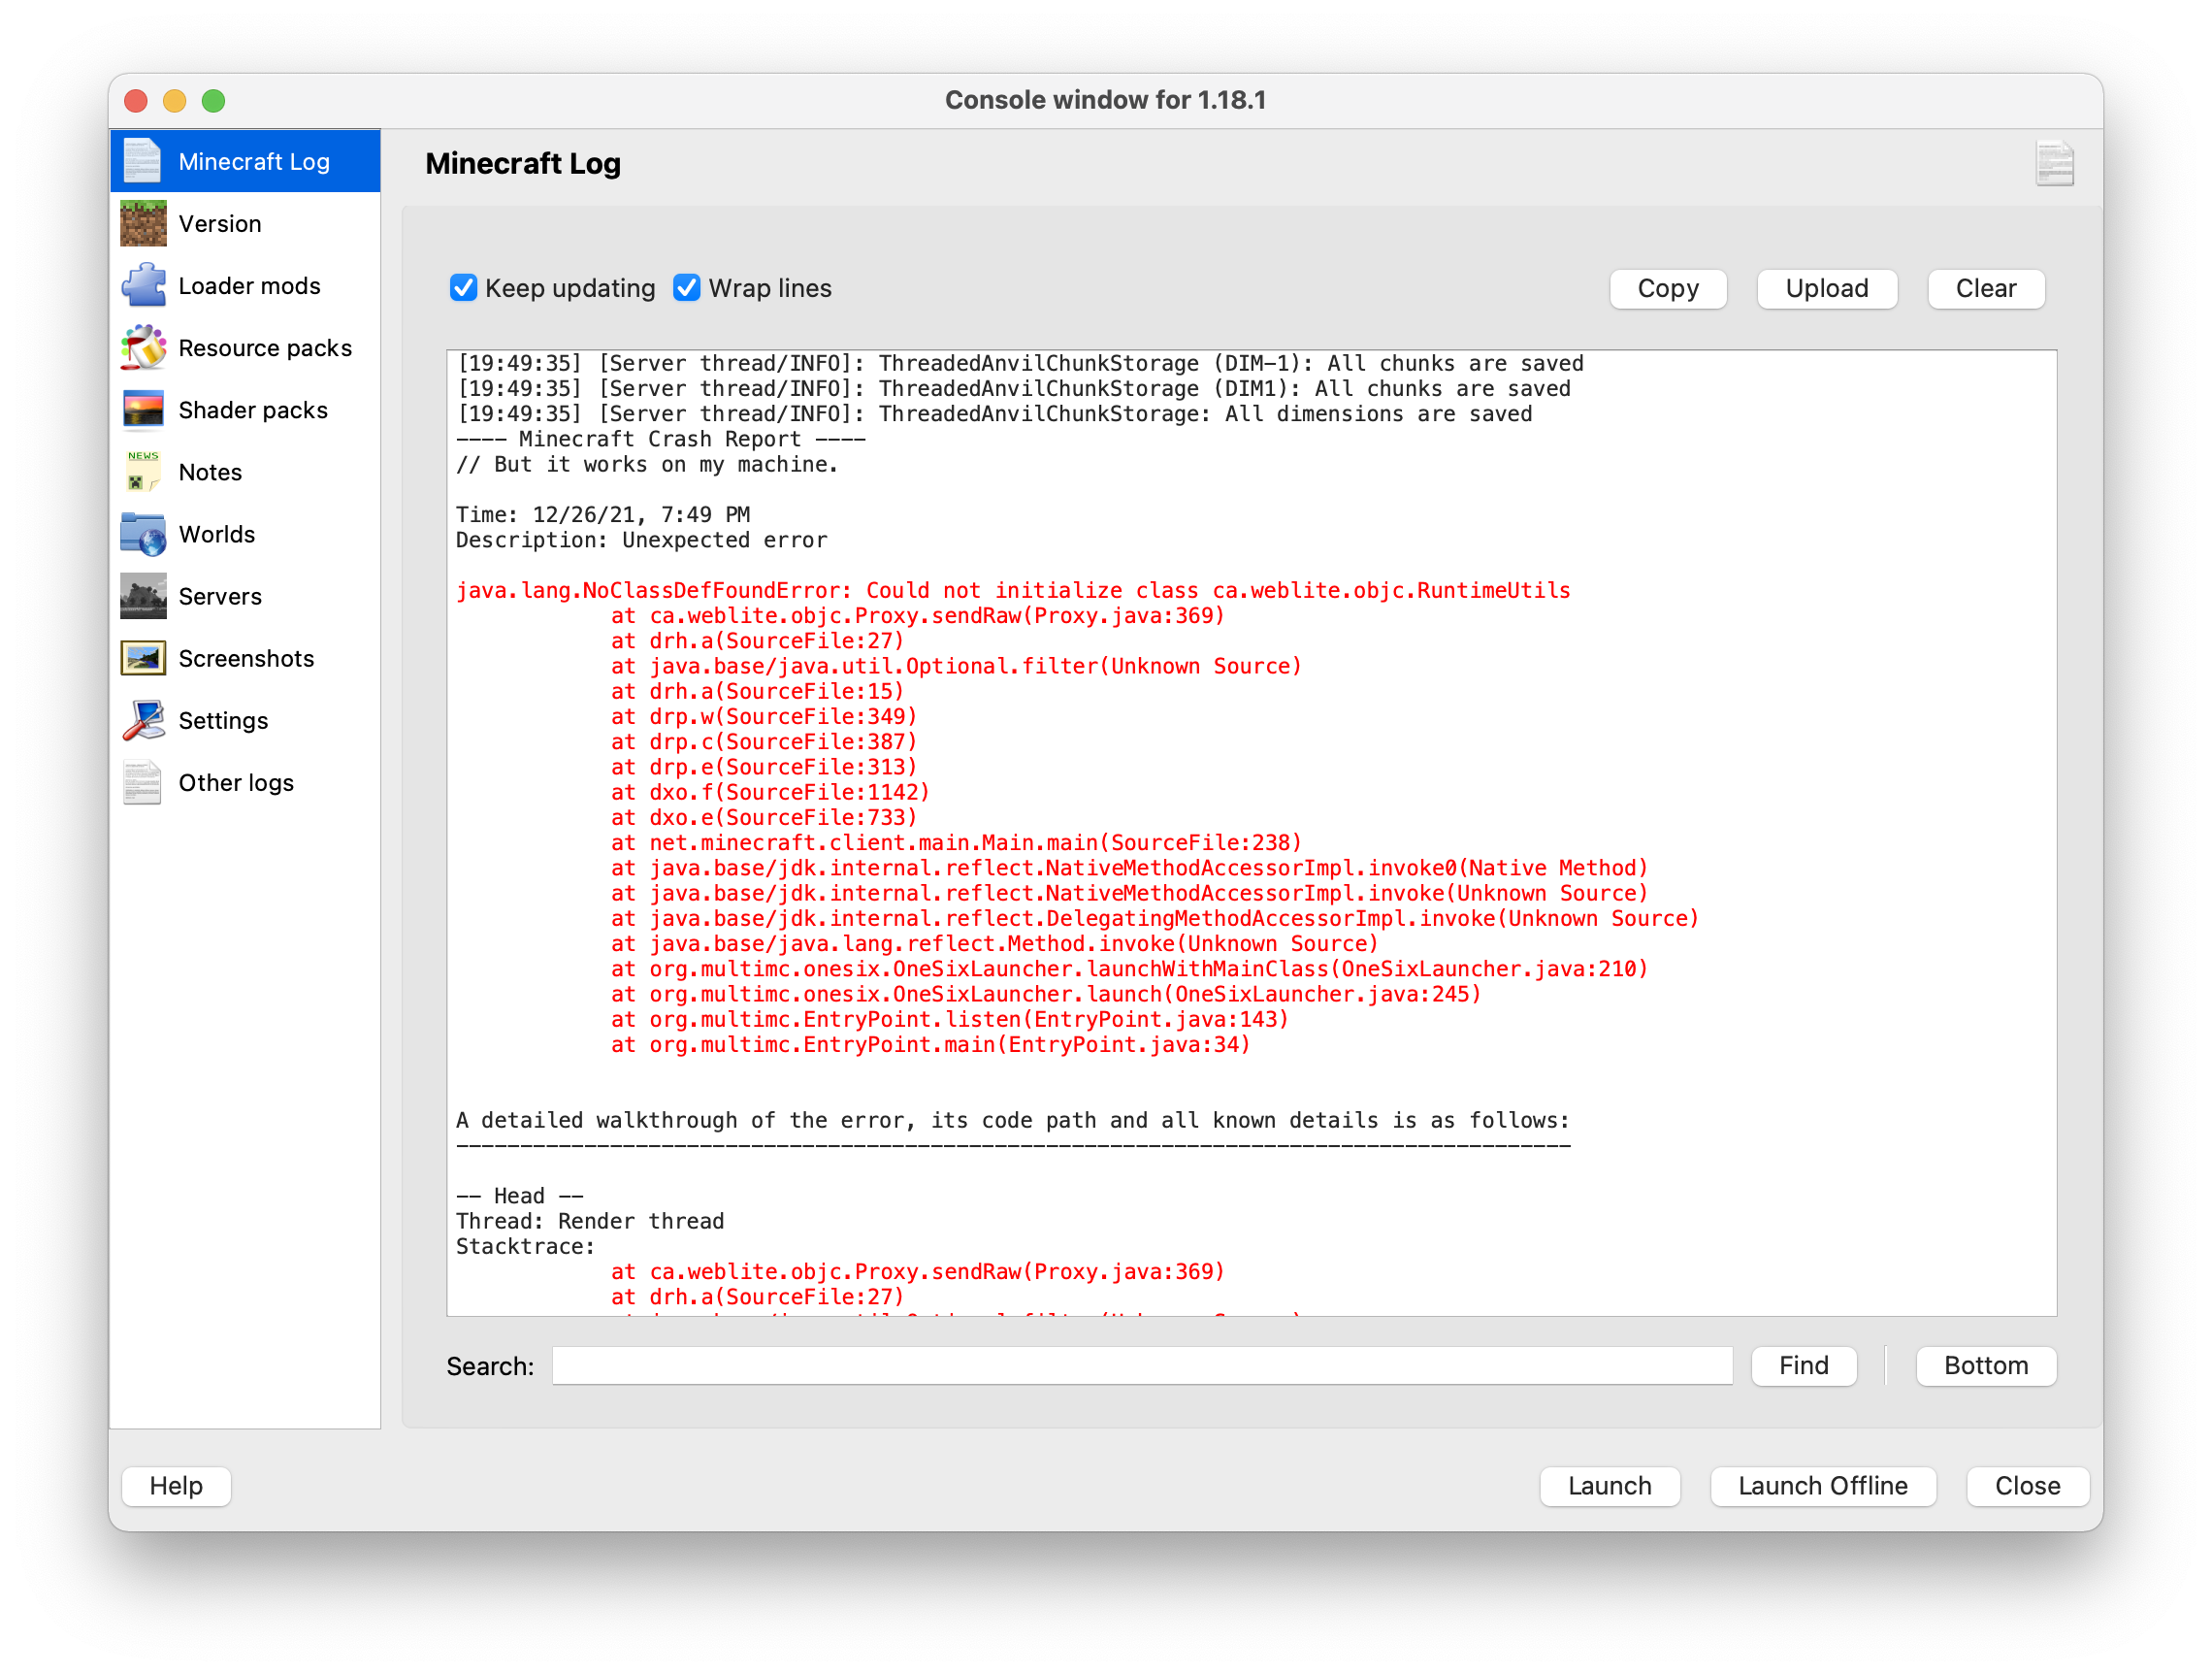
We’ve stumbled on another Java library that requires native code; one that unfortunately is not shipped as a Universal binary, but containing only Intel-specific instructions. This time it’s the Java Objective-C Bridge. Thankfully, this library added support for M1 Macs about a month prior to when I wrote this post (but hasn’t yet pushed a new version to Maven Central, I guess), so we “just” have to compile it on our own.
This is the part where you’ll be glad you listened to me earlier and downloaded a JDK (Java Development Kit) instead of just the JRE.
You’ll also need Apache Maven, a tool used to build Java projects. I’m not going to go into how
to download and install it (although it’s really as simple as “download and make sure the bin/
directory is in your $PATH"); you can find those resources elsewhere.
And, uh, not to bury the lede here, but you will also need Xcode–or at least the command-line
tools, which I think (think) you can install by running xcode-select --install in your
terminal. (Unfortunately I did not realize this was a requirement until after I wrote the whole post
and was proofreading it–I already had Xcode installed–or I would have better guidance here.) Since
Xcode is such a large download, this is really a bit out of the way just to play Minecraft if you
don’t already have it installed.
But if you’re all-in on this little experiment and you have all the tools, you can follow the README
and run mvn clean install and watch it go. At the end you’ll have a JAR in the target/
directory:
$ ls -lah target/java-objc-bridge-1.1-SNAPSHOT.jar
-rw-r--r--  1 seth  staff    91K Dec 27 00:20 target/java-objc-bridge-1.1-SNAPSHOT.jar
Just like we did before, we need to copy this JAR into a place that MultiMC can find it. This time, though, we need to create our own “custom package”. Start by navigating to the same “Version” configuration window where we edited the LWJGL config and click “Add Empty”. You can make the name “java-objc-bridge” and the uid “ca.weblite.java-objc-bridge”, then click Edit and paste the following JSON into the editor window:
{
    "formatVersion": 1,
    "libraries": [
        {
            "MMC-filename": "java-objc-bridge-1.1-SNAPSHOT.jar",
            "MMC-hint": "local",
            "name": "java-objc-bridge:java-objc-bridge-1.1-SNAPSHOT:1"
        }
    ],
    "name": "java-objc-bridge",
    "type": "snapshot",
    "uid": "ca.weblite.java-objc-bridge",
    "version": "1.1"
}
Close the window, then click the “Move up” button until our new custom package is at the top of the
list. Now click “Open libraries” and copy the java-objc-bridge-1.1-SNAPSHOT.jar file you just
built into the libraries folder, right next to the LWJGL one we added earlier.
Phew! Let’s try this again!
FINALLY.
Let’s Wrap This Up
Well that was a lot of fun, wasn’t it? (You can stop laughing now.)
This will get you working for Minecraft 1.18. Other (older) versions of Minecraft use a different Java version and rely on different libraries (or different versions of the same libraries we’ve already seen), and so each may pose their own unique challenges to getting a fully-native Minecraft experience set up. Hopefully Mojang will support the M1 natively in the near future, at which point none of this post will be relevant any longer.
At the time of this writing, a fork of MultiMC (called “ManyMC") exists that supposedly solves
all of these problems for you, for many versions of Minecraft and Minecraft Forge. Right now it has
a large disclaimer on the top of the README, cautioning that it is an unofficial project, so its
state of support may change at any time. I like how that project handles transparently serving
corrected natives. One drawback for me is that in my limited poking at it and its various supporting
repos, all I found were compiled JARs and not the patches required–if any–to get them working on
the M1. I would approach it with the same hesitancy as I do the other “Minecraft on M1” hacks that
ask you to download precompiled JARs that come without source code. No, the authors are not required
to provide the sources (unless the code’s license requires it), especially if all they’re doing is
recompiling the library to get arm64 natives. And I’m sure that many people who just want Minecraft
to work well on their new Apple Silicon won’t care about this aspect of it, and that’s perfectly
okay. Heck, I’ve been known to pipe curl to sh a few times, myself, so maybe I’m being
hypocritical here. I guess in this instance it would just be nice if I could both trust and
verify.
So, almost 3,000 words later: do what you want, play Minecraft the way you want, and have some fun!
Maybe in a part 2 we can see what it will take to get a Minecraft Forge-based client up and running. (Spoiler alert: more of the same, really!)